Creating Styles and CSS in Expression Web
Expression Web provides you with a fantastic built CSS Editor, which you can use in a variety of ways.
- Configure Authoring and CSS properties in Expression Web to use CSS features
- Create a external cascading style sheet
- Link to an external cascading style sheet
- Create an embedded CSS
- Create a Inline Style
- Create a Style
- Modify a Style
- Apply a Style
- Delete a style from a cascading style sheet
- Remove a style from content
- Attach or detach an external cascading style sheet
- Resources for CSS
Configure Authoring and CSS properties in Expression Web to use CSS features
If you have not already read and implemented my Expression Web Setting up Ebooks for your version of Expression Web then its time to do so now, the Authoring properties in Expression Web to use CSS features need to be configured FIRST.NOTE: Authoring properties determine what types of browsers can view your pages and what types of scripts will run correctly on your pages.
CSS 1.0 enables you to add attributes to a tag, such as increasing the space before or after a paragraph. CSS 2.0 enables pixel-precise positioning and grouping of page elements.
You can choose to automate or manually configure your CSS Mode, it is highly recommended if you are new to CSS that you use the Auto settings and let Expression Web guide you in the use of CSS, once again you should configure this setting before getting started.
If you wish to use IntelliSense with CSS you will also need to follow the IntelliSense Tab tutorial
It is highly recommended you follow the whole of the ebook (its not very long) and implement all the settings.
Create a external cascading style sheet
Do one of the following:
1/ File - New - CSS - this will create a new .css file
2/ File - New - Page - Style Sheets - Blank or Choose from the selection.
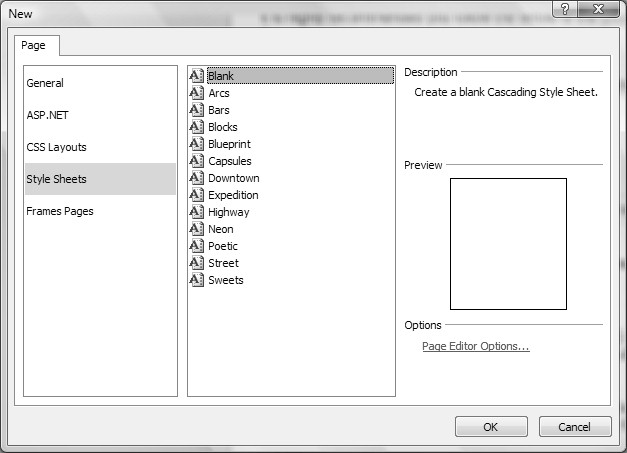
Fig 1 - File - New - Page - Style Sheets dialog box
NOTE: Expression Web comes with a selection of Style Sheets and CSS Layouts that you can use. In fact, it’s a good idea to open one to see what a full sheet looks like, however bear in mind they are extremely basic and simple.
3/ On the 'New Document' Icon in the Common or Standard toolbar menus click the drop down arrow and select CSS, this will create a new blank .css file.
NOTE: Expression Web creates a new page with a .css file name extension and opens it for editing. Before you can link the .css file to a Web page, you must save it.
Link to an external cascading style sheet
When you want your pages to use the external cascading style sheet you need to link to it from within the head section.
![]()
Fig 2 - Attach Style Sheet
Attach to all pages at once: You can easily attach all your pages at once by using the 'Attach Style Sheet' dialog box. Go to Format - CSS Styles - Attach Style Sheet, browse to your .css file and then select 'All HTML pages' and either Link or Import.
Attach the sheet to multiple selected pages or a folder: In Folder List or Site View select the Folder. To select individual files hold down the control key on the keyboard then go to Format - CSS Styles - Attach Style Sheet, browse to your .css file and then select 'All HTML pages' and either Link or Import.
NOTE: If you link a page to an external style sheet in your Web site, the styles in that style sheet can be applied to any element on the page.Attach to one single page: You can attach an external CSS to a single web page by dragging the .css file onto the open page in Design view. Open a page in Design View, then holding down the LEFT mouse button drag the .css file into the page from either 'Folder List' or 'Site View' and let go, the file will automatically be linked using the link rel="stylesheet" type="text/css" between the head tags in the page. When using Site View you will need to open the page and hover over the page tab you wish the sheet to be attached to.
Create an embedded CSS (Cascading Style Sheet)
To create an embedded or internal CSS, you must define a style that you want to include in it. There are a number of ways of doing this.
Open the page you want to insert the embedded sheet. In ‘Page’ view, at the bottom of the document window, click ‘Design’.
- On the ‘Format’ menu, click ‘New Style’.
- In the 'Apply Styles' or 'Manage Styles' panels click 'New Style'.
- On the 'Style toolbar', click 'New Style'.
In 'New Style' in the 'Define in' drop-down menu, select 'Current page' and make a style.
NOTE: You can make the ‘Style Toolbar’ available by right clicking on an unused area at the top of Expression Web and selecting the ‘Style Toolbar’.
However, I find it far faster in page that has not been attached to a dwt to right click in 'Design View', hit 'Page Properties', and choose the 'Formatting' tab and select white for background and press ok. This makes the embedded code needed to contain the embedded styles, then it is quick matter to remove the body code, by using the background color style there is no corresponding html code to remove.
<style type="text/css">
body {
background-color: #FFFFFF;
}
</style>
It is fairly easy to make indiscriminate use of the embedded sheet by using the Common or Standard Toolbars without thought. It is recommended you turn off the toolbars if you are used to using them, so that if you need to use the toolbar you think about what you are doing. When you have finished editing a page its a good idea to check the head tags to see if you generated any by mistake. Worst if you did not follow the Setting up Expression Web Ebook or tutorials then you will have a plethora of inline styles to deal with.Create a Inline Style
When you want to create a Inline style you use this to apply a style directly to a HTML tag for a set of properties for a single or block of items. You might not want to reuse that style and this is perfect time to use it.Use the 'New Style' dialog box to do this. Format - New Style - in the 'Selector' pane, choose 'Inline Style' select 'Current Page' in the 'Define in' pane and proceed to make your style.
This example is applied to a <p> tag.
<p style="font-weight: bold; font-style: italic; color: #FF0000"></p>
NOTE: When you save your HTML file, your Inline styles are automatically saved along with your file.
Create a Style
There are a variety of ways to create a style and this can be done through:- New Style dialog box
- CSS Properties Task Panel
- Type directly into an External, Internal CSS or Inline Style
New Style dialog box
The New Style and Modify Style dialog boxes enable you to design a new or existing style and preview the style's appearance as you design it.
1. 'New Style' dialog box can be accessed through the 'Format' menu, 'Apply Styles', 'Manage Styles' Task Panels or 'Style' Toolbar.- To add a style to an external CSS, open the .css file.
- To add a style to an internal CSS, open the web page.
- To add an inline style, open the web page, and then select the content you want to style.
| Use this | To do this | |
|---|---|---|
|
Selector |
To use a class selector, type a period (.) followed by a unique name.
|
|
|
Define in |
Select one of the following:
|
|
|
Apply new style to document selection |
Apply the style to the current selection in the current web page. |
|
|
URL |
If you selected Existing style sheet in Define in, enter the URL to the .css file. |
|
|
Category |
Select any of the following, and then set the properties that appear to the right in the dialog box:
|
CSS Properties Task Panel
The 'CSS Properties' panel shows you the styles that are used by the current selection in your web page and also shows you the styles' order of precedence. In addition, this panel provides you with a comprehensive list of all CSS properties, which enables you to add properties to an existing style, modify properties you've already set, or create new inline styles.
In 'Design view' or 'Code view', in your web page, select the content you want to add an 'inline style' to. In the 'CSS Properties' panel, under 'Applied Rules', either right-click the 'selector' you want to apply the 'inline style' to or if "(no rules applied)" appears then right-click anywhere under 'Applied Rules', and in the shortcut menu, click 'New Inline Style'. Under 'CSS Properties', set the 'properties' you want.Open your .css file
TIP: Click the link in brackets above the 'Applied Rules' pane to quickly open your .css file. (See Fig 3 below)
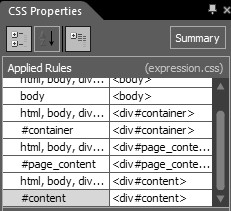
Fig 3 - CSS Properties, link
In the 'CSS Properties' Task Panel which can be opened under the 'Panels' Menu you can start typing the selector - body - and the IntelliSense you set up in the configuration section above now comes into play. The 'IntelliSense' dialog box will appear and allow you to select body, if you then insert { the end tag will also be inserted } and IntelliSense will suggest properties and then values for you to insert.
Once you have just one style inserted CSS Properties will be populated and you can select and make any of the styles using the CSS Properties Panel.
NOTE: When you set the CSS schema in the Authoring tab of the Page Editor Options dialog box, if a CSS property is not supported the property is not listed in the CSS Properties panel.
Modify a Style
When you want to Modify the properties of a style you can do so from a variety of locations.
- CSS Properties Task Pane - Enables you to edit only styles that the current web page uses. (This means styles you can select in Code view or any style in an open .CSS file.
- Apply Styles Task Pane - Enables you to edit any style contained in the Style Sheets of the Current web page. (Also styles that web page does not use)
- Manage Styles Task Pane - Enables you to edit any style similar to Apply Styles Task Pane
Modify Style dialog box enables you to design a new or existing style and preview the style's appearance as you design it.
Please visit Modify the properties of a style to find out how to do so. You might also want to Rename a Style.
Apply a Style
The 'Apply Styles' panel enables you to create, modify, apply, remove, or delete styles, and attach or remove an external CSS. The panel identifies style types, and shows you if the style is used in the current web page and by the current selection.
When you want to Apply a class or id selector from your style sheet you can use one of the following:
- Apply Styles Panel
- Manage Styles Panel
- Style Toolbar
The difference between them is that 'Apply Styles' Panel allows multiple styles to a selection whilst the 'Manage Styles' Panel allow only one, with the 'Style Toolbar' it enables you to name and apply new undefined styles within your page in a timely manner.
To apply a style
In Design view or Code view, in your web page, select the item you want to apply a style to.
Do one of the following:
- To apply multiple existing styles, in the 'Apply Styles' panel, press CTRL while you click each style that you want.
- To apply a single existing style in the 'Apply Styles' panel, click the class or ID style you want.
- To apply a single existing style in the 'Style toolbar', in either the Class or ID drop-down box, click the style you want.
- To apply a single existing style in the 'Manage Styles' panel, right-click the class or ID style you want, and in the shortcut menu, click 'Apply Style'.
- To create and apply a new style without defining any properties, in the Style toolbar, in either the Class or ID box, type a unique name for the new style.
Delete a style from a cascading style sheet
When you no longer need a particular style, you can delete the style from your cascading style sheet (CSS) by using the Apply Styles panel or Manage Styles panel, depending upon the type of style you want to delete.
NOTE: Deleting a style from an external or internal CSS doesn't remove references to that style from your web pages. For more information, see Remove a style from content below.
To delete a style from a cascading style sheet
Do one of the following:
- To remove a style from an external cascading style sheet (CSS), either open the .css file or a web page the CSS is attached to.
- To remove a style from an internal or inline CSS, open the web page that contains the CSS.
Do one of the following:
- To delete a style from an open .css file, in the 'Manage Styles' panel, right-click the style and select 'Delete', and then click Yes in the confirmation dialog box.
- To delete a class or ID selector from the CSS of an open web page, in the 'Apply Styles' or 'Manage Styles' panel, point to the style, click the down arrow, select 'Delete', and then click Yes in the confirmation dialog box.
- To delete an inline CSS in an open web page, either put your cursor in text that uses the inline CSS or select the content that uses the inline CSS. In the 'Apply Styles' panel, point to the style, click the down arrow, select 'Remove Inline Style', and then click Yes in the confirmation dialog box.
Remove a style from content
Apply Styles enables you to remove all or a singular instance of a class or ID selector, or inline style from any of your content based on a current web page. However, it only removes the reference to the style and does not remove the style from the external or embedded CSS, so that you can continue to apply the style to other content.
Element selectors are automatically applied to associated HTML elements, so you can't remove them from particular content in a web page. In the 'Apply Styles' panel element selectors are listed under the heading Contextual Selectors and to further identify them they are labelled with a blue dot .
TIP: To help you identify styles that are in use, the Apply Styles panel displays a circle around the coloured dot next to styles used in the current web page. When you put the cursor in content or select content, the Apply Styles panel displays a solid rectangular border around every style that the content uses.
To remove one instance of a style from a web page
Select the content that you want remove the style from in either Design or Code View
Do one of the following.
- To remove a class selector, ID selector, or inline style, in the 'Apply Styles' panel, point to the style that you want to remove, click the down arrow, and according to the type of selector (class, ID, or inline), select 'Remove Class', 'Remove ID', or 'Remove Inline Style'.
- To remove either a class selector or an ID selector, in the 'Style toolbar', in the Class or ID box, clear the style name.
To remove all instances of a style from a web page
With your web page open, do one of the following.
- In the 'Apply Styles' panel, point to the style that you want to remove, click the down arrow, and then select 'Select All Instance(s)'.
In the 'Manage Styles' panel, right-click the style that you want to remove, and in the shortcut menu, click 'Select All Instance(s)'. - In the 'Apply Styles' panel, point to the style again, click the down arrow, and according to the type of selector (class, ID, or inline), select 'Remove Class', 'Remove ID', or 'Remove Inline Style'.
To remove all class and inline selectors from a selection
In 'Design view' or 'Code view', in your web page, put your cursor in or select the content that you want to remove the styles from.
In the 'Apply Styles' panel, under 'Select CSS style' to apply, click 'Clear Styles'.
TIP: To remove all styles and HTML formatting from content that is selected, Format menu | Remove Formatting.
Attach or detach an external cascading style sheet
Caution! If you select ‘All Pages’ in the ‘Link Style Sheet’ dialog box, Expression Web will erase all style sheets that are on your pages and replace them with the new style sheet choices that you have selected. This can be a quick way to apply new styles to your entire Web site but can cause problems if you didn't intend to remove existing style sheets.
TIP: You can attach an external CSS to a single web page by dragging the .css file onto the open page in Design view.
When you want to attach the external CSS to multiple pages use the 'Attach Style Sheet' dialog box instead.
When you no longer want a web page to use the styles of an attached external CSS, you can detach the CSS from that page in one step by using the Apply Styles or Manage Styles panel. When you want to detach an external CSS from multiple web pages or a whole site, you can use the Manage Style Sheet Links dialog box instead.
NOTE: Deleting a style from an external or internal CSS doesn't remove references to that style from your web pages. For more information, see Remove a style from content above.To attach an external CSS to a web page by dragging and dropping
Open the web page in 'Design view'.
Drag the .css file from either the 'Folder List' panel or the 'Site View' onto the page.
To attach an external CSS to one or more web pages or to a .css file
To select the files that you want to attach the CSS to, do one of the following:
To attach the CSS to a single web page, open the web page.
To attach the CSS to all web pages in a site, open the site.
To attach the CSS to multiple pages, in the 'Folder List' panel or 'Site View', select the web pages that you want to use the CSS.
To attach the CSS to all the pages in a folder, in the 'Folder List' panel or the 'Folders view' of the 'Site View' window, select the folder.
To attach the CSS to a different .css file, open the .css file to which you want to attach the CSS.
Do one of the following:
On the 'Format' menu, 'CSS Styles' | 'Attach Style Sheet' .
In the 'Apply Styles' or the 'Manage Styles' panel, click 'Attach Style Sheet'.
In the 'Attach Style Sheet' dialog box, do the following:
| Use this | To do this |
|---|---|
|
URL |
Specify the .css file and its path. |
|
Attach to |
Select the pages to attach the CSS to:
|
|
Attach as |
Select the method of attachment:
|
To detach an external CSS from a web page
- Open the web page in either Design view or Code view.
- In the Apply Styles or the Manage Styles panel, right-click the name of the CSS file (for example, "ewd.css") and select Remove Link.
To detach a linked CSS from multiple web pages
-
Do one of the following:
-
To detach a linked CSS from all pages in a site, open the site.
-
To detach a linked CSS from multiple web pages, select the web pages in the 'Folder List' panel or the 'Site View'.
-
-
On the Format menu, point to 'CSS Styles', and then click 'Manage Style Sheet Links'.
-
In the URL list in the 'Link Style Sheet' dialog box, click the name of the external cascading style sheet (CSS) that you want to detach.
NOTE: The 'Link Style Sheet' dialog box lists only linked CSS files and not imported CSS files. You can detach an imported CSS from only one web page at a time by using the 'Apply Styles' or the 'Manage Styles' panel or by removing the associated @import rule from each web page in 'Code view'.
-
Click one of the following:
-
'Current page' detaches the CSS from only the current web page.
-
'All Pages' detaches the CSS from all pages in the current site.
-
'Selected Page(s)' detaches the CSS from only the pages you've selected in the current site.
-
-
Click 'Remove', and then click OK.
To detach an imported external CSS from a .css file
- Open the .css file that contains the imported CSS.
- Delete the @import rule that references the CSS file that you want to detach.
Resources for CSS
Read the first part of this tutorial Expression Web and CSS - Information about CSS
Written July 2010

Cheshire Web Designs - Cheshire website Designs by Any Expression Web Designs
Owner Any Expression Web Designs and Clarke Abstract Art
Copyright © 2006 - 2021 Tina Clarke of Any Expression Web Designs All Rights Reserved
Are you looking for a Web Designer?Web Designs created by Any Expression Web Designs