Setting up Expression Web Ebooks
Be sure to read Beyond the Basics notes belowFree Setting up Expression Web 1.0 Ebook By Tina Clarke Microsoft MVP - Expression Web
 |
Setting up Expression Web 1.0 Ebook (updated July 08) Previously only readers of the Any Expression Web Tips Ezine could see first hand the tutorials that go to make up this ebook. They are all available here on the site in the Expression Web Tutorials. However it is handy to have your own ebook ready to hand which you can follow along to in Setting up your Expression Web application. |
Free Setting up Expression Web 2.0 EBook by Tina Clarke Microsoft MVP - Expression Web
 |
Setting up Expression Web 2.0 Ebook Published July 2008 We have written this new Setting up ebook about Expression Web 2.0 as there are new features and settings that you need to be aware of. One in particular might have you confused as to what is happening unless you un-tick a certain selection set by default. There are few new beyond the basics settings too which you can find at the end of this page. |
Free Setting up Expression Web 3.0 Ebook by Tina Clarke Microsoft MVP - Expression Web
 |
Setting up Expression Web 3.0 Ebook Published July 2009 - Revised July 2010 The defaults in Expression Web 3.0 are starting to resemble my selections, however there are new things you need to be aware if you have used the previous versions. It also is a good idea to become familiar with the settings as to why you should be using them if you have not used Expression Web before. |
Free Setting up Expression Web 4.0 Ebook by Tina Clarke Microsoft MVP - Expression Web
 |
Setting up Expression Web 4.0 EBook Published July 2010 Revised Sept 2011 New There have been some subtle changes and its well worth reading the eBook to gain a in-depth knowledge of the settings that will affect how you work with Expression Web. This goes a long way to providing the basis of starting your design experience with as little fuss as possible. (Now includes SP 1 and SP 2 updates) |
NOTE: NEW Expression Web 3.0/4.0 beyond the basics notes below
Why is it important to set up your Expression Web application?
By Setting up Expression Web you set the parameters by which you design your web sites, taking the time now, saves you grief in the future. Expression Web setup the right way can enhance your design experience and not only help guide you in the use of CSS but warn you of html errors as you create your template design and content.
Beyond the Basics of Setting up Expression Web
Though the tutorials and Ebook outline the basics of setting up Expression Web, as you become more experienced in using Expression Web you might find yourself tweaking the guidelines I have outlined for you. Not only that but beyond these basic setup guidelines there is more you can do which are even more personal ways of working with Expression Web.
Tools - Application Options - Reports View Tab
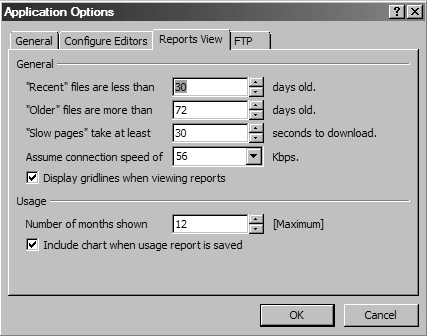
Personally I prefer to set my 'Slow pages' to 30 seconds to download. If like me you can't think in Kbs, instead of looking at the status bar for the Download Statistics which is in kbs.
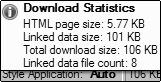 Look at the Slow pages Site Report which will list any pages over 30 seconds. The page represented here on the left has a page load of 29 seconds. For a connection speed of 56 Kbps, which I worked out by looking at the Slow Pages Site Report. You can find this under Tools - Application Options - Reports View Tab.
Site - Site Settings - Advanced Tab
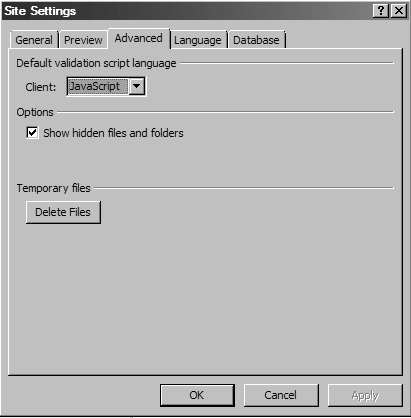
By Selecting the 'Show Hidden Files and Folders' radio button, you will find maintaining your web easier from the get go. Expression Web will hide any files or folders marked with a underscore at the beginning of the file name. So by enabling this to begin with you will forgo wondering just where you folders and files got to.
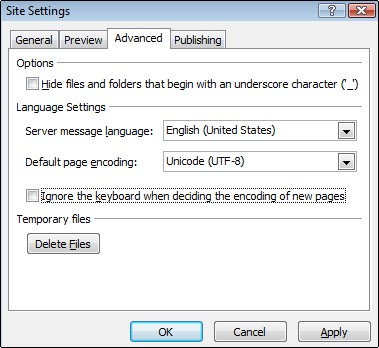
NOTE: In Expression Web 3.0/4.0, there is no need to set this as hidden files are shown by default
Tools - Page Editor Options - Auto Thumbnail
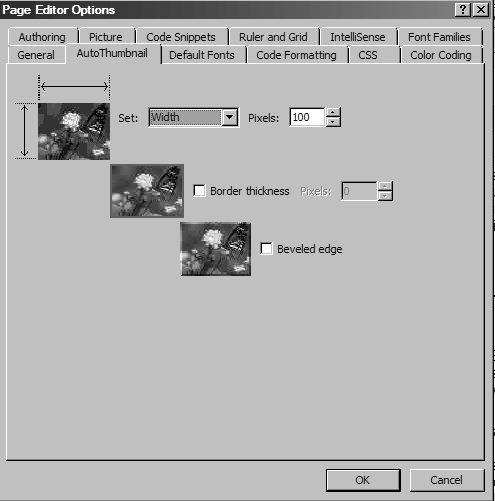
To avoid all your thumbnails that might be hyperlinked showing a hyperlink border one can preset thumbnails in the Page Editor Options to zero. However this is redundant when we use the body img style of border: 0px; in the external cascading style sheet giving a universal effect to all images within the web. We also don't want border="0" appearing within the html code as it is deprecated according to the latest standards.
It is in no way 'cool' to show hyperlink borders on one's images and gives a decidingly unfinished look. Remark at the top of the page that one's thumbnails should be clicked to open up a larger graphic. We use thumbnails when we want to include more graphics on a page, but the page load would be too heavy, by using thumbnails this allows us leeway to show all the information on one page in a visual manner, exactly as I have done on this page.
Furthermore the old bevel is still available for selection in Auto Thumbnail, a holdover from FrontPage, I think it goes without saying (but I will say it) that bevelling a graphic is liable to see your site appearing in web pages that suck.com Bevelling is for buttons, and even then it should be done in a graphic editor. So whatever you do DO NOT tick that selection. The third option is for the size of the thumbnail, I find 100x100 pixels to suit me tweak to the size you prefer.
Application Options - General Tab - Use your current windows color scheme
Applies to Expression Web 2.0 Only
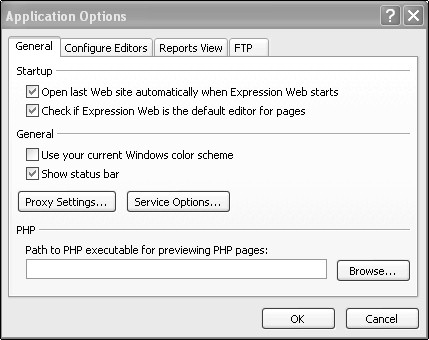 The default colour scheme of Expression web 2.0 is black and grey. If you do not like it however, then its a simple matter to go to the 'Application Options' on the 'Tools' menu and in the 'General Tab' tick 'Use your current windows colour scheme'.
Personally, to differentiate between the different versions which I keep to answer questions with, I keep EW 2.0 set up with the default black colour so I do not have to check the about box for the version every five minutes, if I am swapping back and forth.
Expression Web 3.0
You cannot change the colour scheme by default in Expression Web 3.0. You need to apply service pack 1 (NO LONGER AVAILABLE ON MICROSOFT SITE) which provides a new Application Options setting that lets you select the Windows Color Scheme instead of the default.
The colour scheme is slightly different in that backgrounds and contrasts are not the same as the black and grey colour scheme in Expression Web 2.0 you might find like me that it causes you some accessibility problems.
In Expression web 4.0 the default colour scheme is the same as EW 3.0 however, the Windows Color Scheme is included in Application Options on the General tab.
Inserting an Include Page command on the Toolbar
Applies to Expression Web 2.0 Only
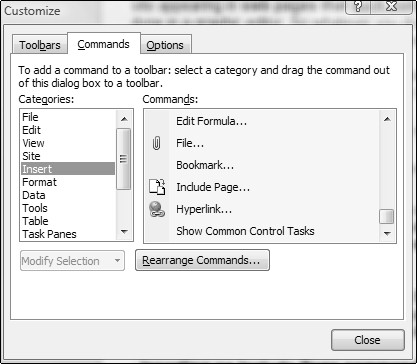 Microsoft have bowed to public demand and inserted the Include Page command back into EW 2.0, however it is not available by default, you have to place it on the toolbar or menu for your usage. This is simple and easy to do. It can be found on the Tools - Customize - Commands Pane - Under the Categories select Insert, then on the right hand pane scroll down and select Include Page and drag to the toolbar or menu you wish it to reside in. You can find more in-depth instructions on the Custom Toolbar Tip.
Expression Web 3.0
Customize for menus and toolbars is no longer an option. However you can find the Include Page icon on the Standard Toolbar, if you are used to using just the Common Toolbar and wish this feature also, then you will have to use both in future for quick access. Though you can save the code as a snippet and insert it directly into the html instead.
SNIPPETS UPDATE: In EW 4.0 SP 2 the snippets tab in Page Editor Options has now been replaced by a Snippets Panel.
Expression web 4.0 SP 1 and SP 2
Just like Expression Web 3.0 there is still no Customize feature in Expression Web 4.0. However there is a Add-in, Custom toolbars for Expression Web 4.0. [Link is to a download site - download at your own risk] There is also an add-in for Custom Toolbars for Expression Web 4.0 SP1, however this is no longer available. In Expression Web 4.0 SP2 the Custom Toolbars is installed by default, however it is VERY limited on what it can do and does not contain the flexibility and accessibility that the built in options allowed in EW 1.0 and 2.0.
These are all more personal settings and why I've not included them in the Ebook(s), but if your a newbie to web design they are little tips and tricks you need to know about.