Dynamic Web Templates in Expression Web

This tutorial outlines how to do all the actions that one can complete with a Dynamic Web Template (DWT). However I go into greater detail in my Free Expression Web Dynamic Web Template Ebook If you are moving from templates or themes to a dwt, then you firstly have to clean your pages of old messy code. The Free DWT ebook goes some way to informing you of some simple methods you can employ and notes numerous resources. However if you want a more in-depth coverage you might like to take a look at our Migrating from FrontPage to Expression Web Ebook.
All about DWTs in Expression Web
- Saving a page template as a Dynamic Web Template
- Creating Editable Regions on a Dynamic Web Template
- Rename an Editable Region
- Remove an Editable Region
- Editing a DWT
- Attach a Dynamic Web Template
- Attach a different Dynamic Web Template
- Changing code in editable regions in attached pages
- Manually update attached web pages
- Detach files from a Dynamic Web Template
- Troubleshoot Dynamic Web Templates
Saving a page template as a Dynamic Web Template
Make a folder called dwt to store your dwt file in.
Normally when you want to create a DWT, you should start with a blank page saved as a normal .htm page, adding your formatting with an embedded style sheet. Regarding your menus, I suggest using Page Includes, which after creating a template your happy with as regarding clean code and validation, you move the embedded styles to an external style sheet. Then you save the .htm template as a DWT. Then you add Editable Regions.
NOTE: In order to maintain the relationships between a .dwt file and its attached pages Expression Web uses Metadata which is stored in folders which are hidden by default to prevent accidental deletion, or them being moved or changed. The _vti_cnf folder contains information about every file, such as which links are within the file. The _vti_pvt folder stores all of the configuration information for the site.
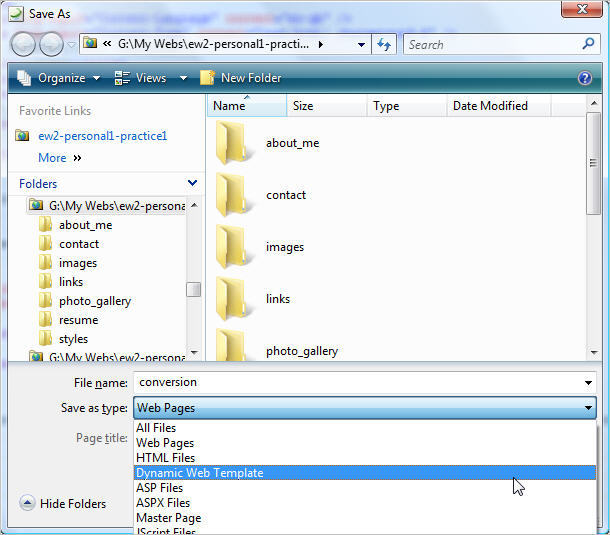
Go to File | Save As
under File Name, name the file
Where it says Save as Type: hit the scroll arrow and select Dynamic Web Template *.dwt, press Save.
![]() View Screenshot - Fig 1 - Save as .dwt
View Screenshot - Fig 1 - Save as .dwt
NOTE: You must create an editable region before you can attach a dwt to page, though Expression Web will let you save it as a dwt first.
If you are working on an existing site, then you might want to remove the existing template, and if you used Page Includes save the path to the include at the top of the content when you remove the template for when you have attached the DWT and are selecting the paths to the Include Pages this helps you remember what they are. Needless to say there are many other scenario's of an existing site. You might have shared borders, navigation bots and themes in place and there are quick fire methods for preparing your site, this is beyond the scope of this tutorial and in-depth methods have been developed for a variety of scenario's which can be found in our Migrating from FrontPage to Expression web EBook as outlined in the introduction.
Creating Editable Regions on a Dynamic Web Template
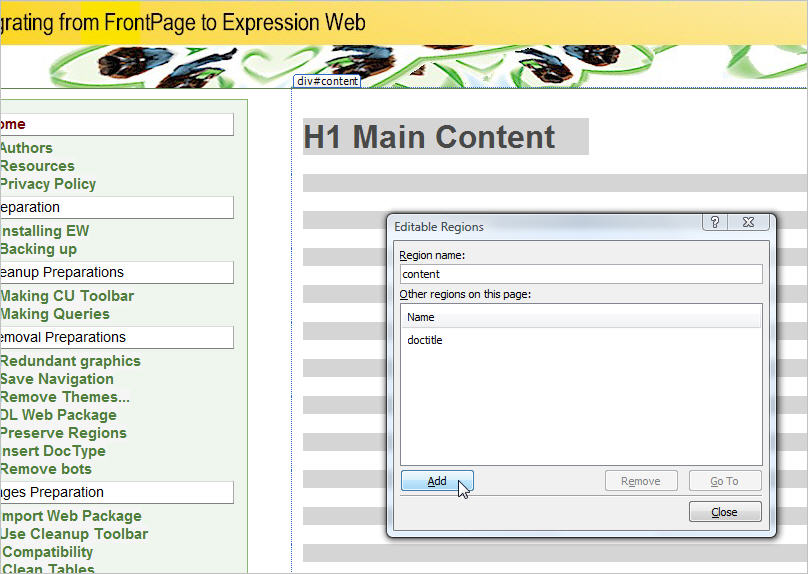
Open your DWT template that you have just made. To select your first editable region go to Page View and select the Design View tab, lets start for instance with your main content. Place the cursor on the page at the beginning of the content and drag your mouse to the end of the content. Then right click and choose Manage Editable Regions the Editable Regions dialog box will appear.
![]() View Screenshot - Fig 2 - Editable Regions
View Screenshot - Fig 2 - Editable Regions
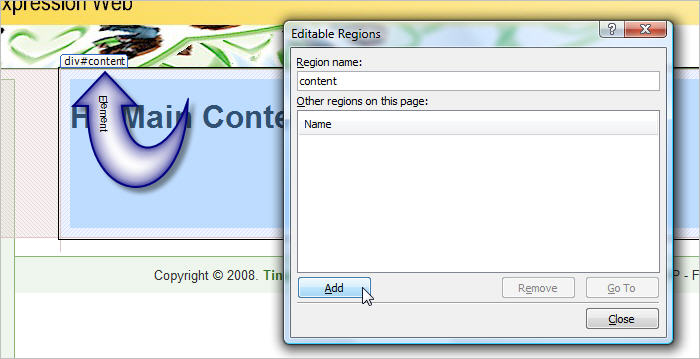
NOTE: If you do not select an element, the element preceding the location of the cursor will be defined as the editable region.
![]() View Screenshot - Fig 3 - Element
View Screenshot - Fig 3 - Element
Where it says Other regions on this page: there will be listed already doctitle, the default editable region that has already been saved. What you need to do next is name the region you are saving which is, in my example content. So enter that in the section where it says Region name: Then press 'Add', then 'Close'.
NOTE: The editable region name must be all one word and in lower case and you can call it anything you want, however relating it to the placement on the page helps keep it straight for you.
Next do the same for other editable regions you want, in my case I want an editable region for the menu on the left hand side. So repeat as above naming each region with its own unique name.
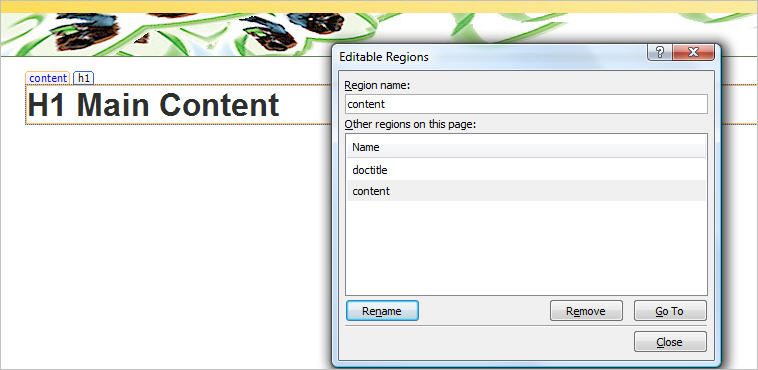
Your editable regions should look like Fig 4, outlined in yellow (colour depends on the settings you have, the default being yellow) with the name of the editable region.
![]() View Screenshot - Fig 4 - Editable Region outlines
View Screenshot - Fig 4 - Editable Region outlines
ATTENTION - I have outlined further information under the below headings you should pay particular attention to the Head Tags and Scripts if you want to retain your keywords and description Meta tags and any scripts for each page.
Head Tags ( doctitle )
Expression Web will, by default add the following code to the title tag in Code View.
<!-- #BeginEditable "doctitle" -->
<title>Page Title Here</title>
<!-- #EndEditable -->
Copy the editable code in Code View and encase it around the Keywords and Description Meta tags, it should look like the following.
<!-- #BeginEditable "doctitle" -->
<title>Page Title Here</title>
<!-- #EndEditable -->
<!-- #BeginEditable "description" -->
<meta name="DESCRIPTION" content="site description here">
<!-- #EndEditable -->
This will preserve descriptions you ALREADY have in place on your pages. If you want to change your title, keywords or descriptions you can right click on the page and choose Page Properties or go to Code View and do it manually.
Rename the editable from "doctitle" to an appropriate name such as "description" and "keywords"
WARNING: With a page that has a DWT attached you must not use Expression Web Meta Tag addons to APPLY your tags, as they will change the editable regions coding of the meta tags and the Expression Web DWT will assume you are trying to change this and ask you to save or restore. You want to in fact keep your original code with the editable meta tags around the metas. Of course you can use the Addons as a tool and copy and paste meta tag to code view or in page properties General Tab for each Meta. The developers know about this problem and are working to provide updates.
Scripts such as JavaScript (scripting)
If you have any scripts within the head tags when you first attach a dwt to a page it wont be preserved. So you must save it to a notepad file, attach the dwt to a page, and then reinsert your script, thereafter it will be applied to any subsequent attachments. Put the following code around your scripts in the head tag.
<!-- #BeginEditable "scripting" -->
<!-- Scripting area here -->
<!-- #EndEditable -->
This is really useful for JavaScript menus. Using these menus with a dwt saves you a lot of time. There are issues however be sure to see the * Troubleshooting section.
ASP and PHP Pages
It is best to avoid attaching a dwt to a page with ASP or PHP code on it, though you can attach to a .asp or .php page that does not have asp or php coding on it.
To quote the help in Expression Web:
"Both master pages and Dynamic Web Templates allow you to create a consistent layout that can easily be updated in all the pages in your site. If you are working with ASP.NET files, use master pages to define a consistent look with shared content across pages. If you are working with HTML files, use Dynamic Web Templates."
Why not just use master pages? To do that you need to change the file names of your attached pages from .htm or .html to .aspx, and that impacts your search engine optimisation, so think very carefully before taking that route. If you do you will need to use 301 redirects on all the changed file extension pages.
Menus
When you made your template I suggested you used Include Pages for your menus, this will allow you have different menus on different pages and you retain all the control that Include Pages give you over navigation bots, which you need to replace anyway, just remember to make this area a editable region, because the content changes from page to page.
TIP: Editable regions are like includes in that fact that they stretch across the width of the page if you want to contain an editable region you have to implement tables or Divs just like with include pages.
Rename an Editable Region
Open your current .dwt
Position the cursor in the menu region, in this example it is called sidebar.
Right click and choose Manage Editable Regions
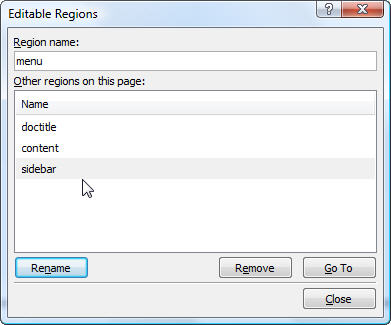
The Sidebar region name (or whatever name you are changing is called) should be selected but make SURE that is selected. In the Region name pane type in the menu region label, lets call it menu for example.
Click the Rename button and you will see the name change from sidebar to menu. (See Fig 5)
![]() View Screenshot - Fig 5 - Select Region
View Screenshot - Fig 5 - Select Region
![]() View Screenshot - Fig 6 - Rename Region
View Screenshot - Fig 6 - Rename Region
Save the current .dwt
You will be asked to update the attached files click Yes.
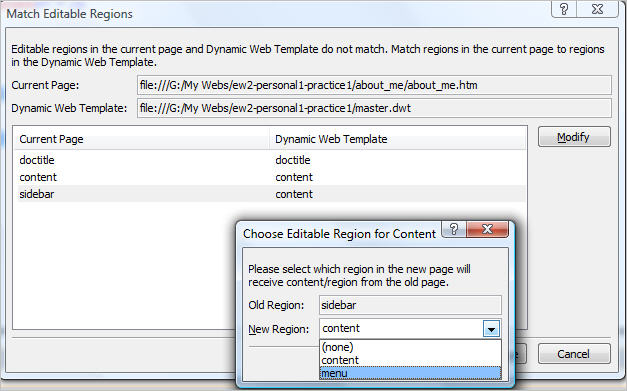
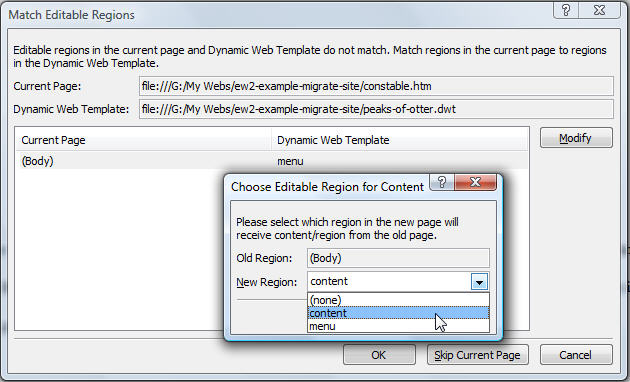
The Match Editable Regions Dialog box then appears.
Note that your doctitle and and content match under Current Page and Dynamic Web Template columns, but that sidebar and content do not.
Select Side bar under Current Page and click the Modify Button
![]() View Screenshot - Fig 7 - Match Editable Regions
View Screenshot - Fig 7 - Match Editable Regions
Press the drop down arrow and select menu press ok and ok again.
The .dwt will then update the changes.
Remove an Editable Region
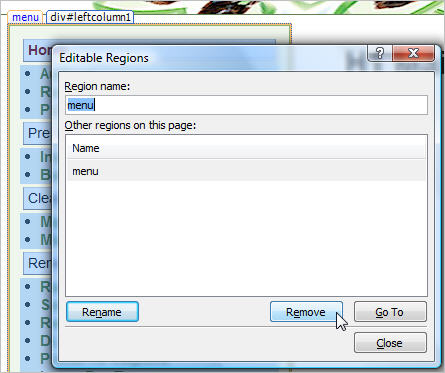
Open the .dwt file, on the file, right-click the editable region that you want to remove, and then click 'Manage Editable Regions'.NOTE: You can identify editable regions by the boxed areas on the page that include a tab called a Template Region Label with the name of each region. If you cannot see the Template Region Labels go to View menu - Visual Aids - select Template Region Labels, and the labels will become visible.
![]() View Screenshot - Fig 8 - Remove Editable Regions
View Screenshot - Fig 8 - Remove Editable Regions
Click Remove, and then click Close.
Go to File | Save. Click 'Yes'.
NOTE: If the Dynamic Web Template that you edited hosts attached files, Expression Web will prompt you to update those files.
Editing a DWT
You can at any time edit your DWT to make changes. When you save your DWT those changes will be applied to any attached pages to the DWT. Expression Web lets you know how many pages are attached and asks if you want to update them.
If you click Yes:
All attached pages will be updated
If you click No:
You can update attached pages at a later date by opening them, then going to Format | Dynamic Web Template | Update selected Page.
Attaching a DWT to two or more pages
In the Folder List, hold down CTRL and click each page you want.
If the Folder List is hidden, click Folder List on the View menu.
Then apply as discussed above, and all your selected pages will be attached to the DWT.
Automatically create NEW web pages that are attached to the DWT.
In Folders View or Folder list right click your DWT and select 'New from Dynamic Web Template' from the pop up menu. A new page will be created and attached to the DWT automatically.
Attach a Dynamic Web Template
Attach a DWT to a page or to all the pages in your web. I suggest attaching to one page first to make sure there are no problems.
Open the page you wish to attach the DWT to, (I suggest the first page in the Folder List).
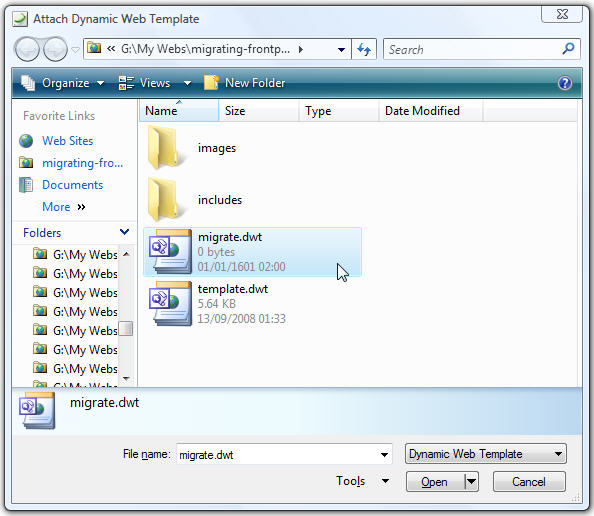
Go to Format | Dynamic Web Template | Attach Dynamic Web Template
The Attach Dynamic Web Template dialog box will appear. Your DWT will be listed, click it to select it and press Open.
![]() View Screenshot - Fig 9 - Attach a DWT
View Screenshot - Fig 9 - Attach a DWT
Once you have attached the .dwt you will be asked the following:
"The content outside the <html> tag in the attached page will be erased when the Dynamic Web Template is attached. You can preserve the content by moving it into an editable region. Script can be moved into the editable region in the <head> tag. Do you want to continue with the attachment?"
NOTE: If you adding a dwt to your content, your content should NOT REPEAT NOT have an existing template around the content, as that template will be included along with the content. The DWT see's the whole area of what is on an existing page as the content area. So BEFORE you attach a DWT to your pages make sure you have removed the template AND cleaned the existing code from your content. Otherwise, in the future you will be faced with more work (As I said in the introduction the DWT Ebook goes into more detail about this.
Click Yes.
![]() View Screenshot - Fig 10 - Preserve Content
View Screenshot - Fig 10 - Preserve Content
The Choose Editable Regions for Content Dialog box will then appear, in the Pane will be listed under Current Page: (Body). If your content region is not listed under Dynamic Web Template: select (Body) and the Modify button will ungrey. Click the Modify button and a small drop down box will appear click the down arrow and select content, press ok then press ok on the Choose Editable Regions for Content dialog box.
![]() View Screenshot - Fig 11 - Choose Editable Regions for Content
View Screenshot - Fig 11 - Choose Editable Regions for Content
A dialog box will appear telling you (1 of 1) files have been updated. Press close on this dialog box.
If you switch to Code view you will see your:
- Title
- Description
- Keywords
Have been preserved. (This is because the .dwt was setup with an editable area around the title and description and keywords meta's as we discussed above.)
If you are happy with the one page, then it is time to attach the rest of the pages in the website to the .dwt. Using the keyboard, Press the Shift key and holding it down select the second page in the folder list and the last page in the Folder List. (Look through the list to make sure you have not selected such files as the robot.txt or form or other script files, just your .htm/l pages)
Follow the instructions above for attaching the .dwt.
When attaching multiple pages at one time, after the first time you are asked about preserving the content by moving it to an editable region, and have made the modifications, you will be asked the question again Do you want to continue with the attachment? for each page you are attaching, just press Yes each time, once you have finished, then go to File - Save All.
A dialog box will appear telling you (# of #) files have been updated. Press close on this dialog box. (# denotes the number of pages you are attaching and have attached)
Insert correct navigation
Saved Paths
Open the first page in the Folder List
1. If you are using previously used Page Includes, now is the time to select the path you saved above the content. (as discussed in - Saving a Page Template as a DWT above)
2. Right click and press Cut
3. Double click on the Page Include area where the menu is and in the Include Page Properties dialog box that appears, right click and press Paste.
NOTE: If the path is not correct, observe the name of the Page Include and hit the Browse button, select the includes folder and keeping the name in mind search for the include file. Once found, select it and press ok, and the navigation will appear.
New Page Includes
Double click on the Page Include area where the menu is and in the Include Page Properties dialog box that appears, hit the Browse button. Select the includes folder, and select the correct Page Include for that file.
Work your way down the Folder List till you have finished the whole site.
As you open each page, check it over for any problems and amend as needed.
Congratulations you should have now:
- Cleaned your content code and removed the existing template (if in use)
- Installed a DWT which has been validated and checked
You can now proceed to make new content safe in the knowledge that next time you need to change your formatting or amend your template you will be able to do so easily and quickly, saving you time and effort better spent on other things.
Attach a different Dynamic Web Template
To retain the content in your web pages, you need to keep the same Template Region Labels in the new Dynamic Web Template. In which case you need to first detach the old .dwt. Then attach the new one - to repeat - BUT ONLY if the Template Region Labels match exactly. If the new Dynamic Web Template doesn't contain the same Template Region Labels, Expression Web asks if you want to match the old regions to new regions.
Changing code in uneditable regions in attached pages
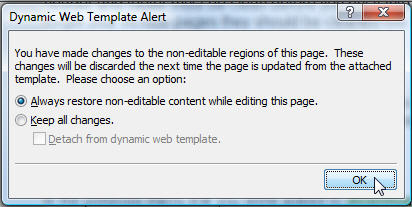
In 'Code View' you can still access the html code of any given page that you are viewing. However if you change the code in a non editable region Expression Web will alert you with a warning that you have made changes to a non-editable region and that the code will be changed back the next time the page is updated. You can do either of the following:
![]() View Screenshot - Fig 12 - Always Restore
View Screenshot - Fig 12 - Always Restore
- Always restore non-editable content while editing this page. - Expression Web will restore any changes and no longer prompt you when you change code in non-editable areas.
- Keep all changes - Expression Web keeps your changes, however next update of the page, the settings from the DWT will be reapplied. For this to not happen you must Detach the page from the DWT.
Manually update attached web pages
NOTE: If there is a conflict among the Dynamic Web Template and attached pages, when you attempt to update the attached pages, Microsoft Expression Web will prompt you to resolve the conflict.
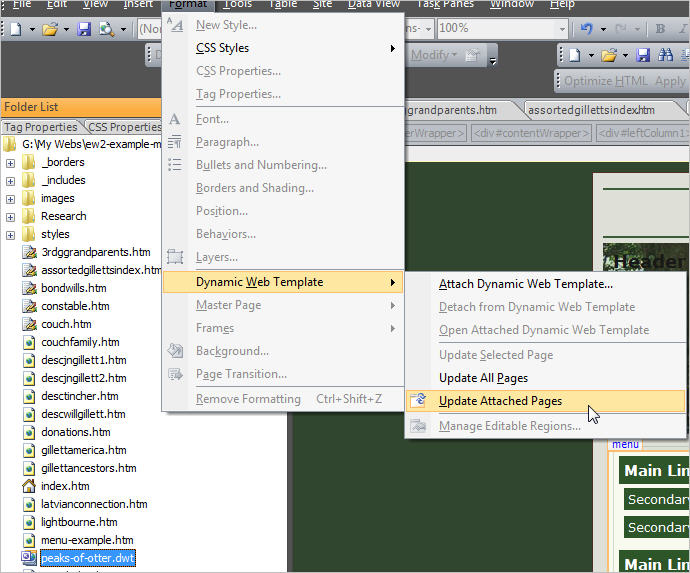
Update Web pages from within the attached Dynamic Web Template
Open your Dynamic Web Template, go to Format | Dynamic Web Template, and then click one of the following:
- Update All Pages
- Update Attached Pages
- Update a selected page in the Folder List
![]() View Screenshot - Fig 13 - Update Attached Pages
View Screenshot - Fig 13 - Update Attached Pages
In the Folder List, click the page that you want to update.
Go to Format | Dynamic Web Template | Update Selected Page.
To update multiple pages go to Format \ Dynamic Web Template | Update Attached Pages
The pages attached to a Dynamic Web Template are managed by using metadata. If the pages attached to a Dynamic Web Template are not properly updated, make sure that you have website metadata added to your site. Site - Site Settings - General Tab, tick 'Manage the website using hidden metadata files'.
If they are still not properly updated Recalculate Hyperlinks under Site.
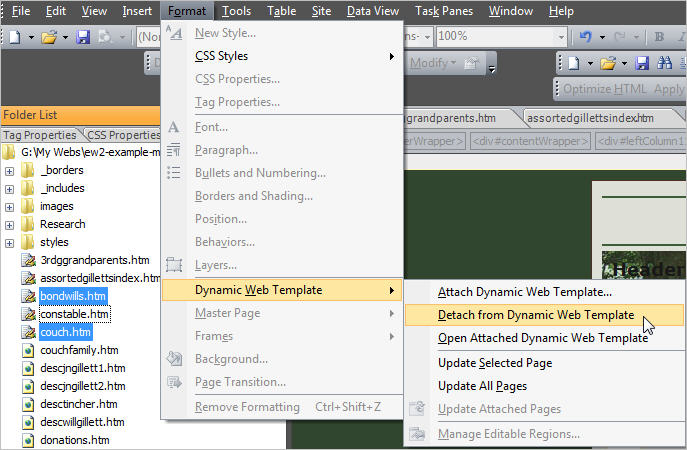
Detach files from a Dynamic Web Template
In the 'Folder List', select the file(s) that you want to detach from the Dynamic Web Template.NOTE: To select multiple files, holding down CTRL on the keyboard and click the files that you want to detach.
Go to Format | Dynamic Web Template, and then click 'Detach from Dynamic Web Template'.
![]() View Screenshot - Fig 14 - Detach from Dynamic Web Template
View Screenshot - Fig 14 - Detach from Dynamic Web Template
NOTE: If you detach a Dynamic Web Template from one or more pages in a site, you remove only the formatting provided by the template - the content is not automatically removed from those pages.
Troubleshoot Dynamic Web Templates
Note: Microsoft have not updated or added all their references to the links I give below for Expression Web so please refer to the Ms FP03 sources for the time being.
1. Any changes you make to a DWT master page and its attached pages on a site that uses a disk-based Web or against a Windows SharePoint Services server might not update.
First you make your changes
Then 'Recalculate Hyperlinks' under Site - 'Site Settings' say 'Yes' when asked to refresh
Click 'Format', point to 'Dynamic Web Template', and then click 'Update all pages'.
NOTE: When the open Web is located on a FrontPage 2002 Extended Server, on a SharePoint Team Services server, the Update all pages feature is not available.
Read more about this at: Attached Pages Are Not Updated When You Save Changes to a Dynamic Web Template and MetaData
2. After you make a change to a DWT, the Update All Pages and the Update Attached Pages menu commands are unavailable. If you are prompted to automatically update the web pages that have a Dynamic Web Template attached, only the web page files that are open in Expression Web are updated.
You can of course just open all the rest of the pages in your site that you want to update, however it is much simpler to only update a DWT when using a disk-based Web or against a Windows SharePoint Services server. If authoring against a FrontPage 2002 Extended Server, on a SharePoint Team Services server then I suggest publishing to a disk based web on your hard drive.
Read more about this at: Dynamic Web Templates do not work correctly when you use the attach and detach operations in FrontPage 2003
3. Scripting inside the <Body> Tag*
The body tag is considered a Non-editable Region therefore upon attachment of a DWT to a page any scripting contained inside the <body> tag will be lost, E.g.
<body onLoad=" resizeTo(382,430);">
This will happen with each and every attachment. So you need to do the following.
- Include the code within the <body> tag, Or
- Rewrite the coding and insert the new code within the scripting editable region.
4. Expression Web does not allow you to link a CSS sheet to a page that is attached to a dwt.
However you can link the sheet within the dwt and then apply to a page.
5. When you attach a DWT to an Active Server Page (*.asp) that contains code (for example, code that creates a connection to a database), the code may be deleted.
Anything outside the HTML tags e.g. ASP code is deleted so you have to cut your ASP code from the page, attach the DWT to the page, then paste your ASP code back again.
6. When you apply a cascading style sheet to all pages of your Web site, the cascading style sheet is not applied to Dynamic Web Template (*.dwt) pages.
This problem occurs because the Dynamic Web Template page extension of .dwt is not considered to be an HTML file name extension by the SharePoint Team Services server extensions, and if the following conditions exist
Your Web site is configured with SharePoint Team Services from Microsoft version 1.0.
You apply a cascading style sheet to your whole Web site.
See the above link for further details.
7. The Title of a page cannot be changed.
In some instances the editable region called doctitle (for Page title) is not created and so you cannot make any changes. To fix this you need to add code for the region.
<!-- #BeginEditable "doctitle" -->
<title>Page Title Here</title>
<!-- #EndEditable -->
NOTE: Make this change in the DWT file and not the pages to which it is attached.
I think however if you follow my method of preparing your DWT, this will happen very seldom.
8. The editable region is locked and not available for modifying.
Expression Web won't allow you to make certain edits, one of which is inserting tables. Any type of formatting can be done (except applying styles), but no layout functions are allowed to the changed formatting.
However there is a workaround to have a table and make changes to it.
- First add a table with default settings to your maincontent area and save the DWT.
- Make a new page and attach the DWT to it.
- Remove the table that will appear in the maincontent area.
- Insert a new table to your specifications, you will be able to make any changes to the table you like.
NOTE: Providing a table exists in the DWT, you can configure a table in any page that is attached to that DWT.

Cheshire Web Designs - Cheshire website Designs by Any Expression Web Designs
Owner Any Expression Web Designs and Clarke Abstract Art
Copyright © 2006 - 2021 Tina Clarke of Any Expression Web Designs All Rights Reserved
Are you looking for a Web Designer?Web Designs created by Any Expression Web Designs