Expression Web and CSS - Information about CSS
When it comes to web design there is nothing like CSS (Cascading Style Sheets) to enhance your design for faster loading and easier maintenance. In this tutorial we attempt to give you a basic outline of how CSS is set out, the rules to follow and why things happen as they do. In the second part of our tutorial we go in-depth to show you the many ways that Expression Web CSS tools can be implemented
- Why use CSS?
- Style rules
- Inherited styles
- Cascading Styles
- Ways to apply CSS Formatting
- External Cascading Style sheets
- Embedded cascading style sheets
- Inline cascading style sheets
- Other Types of sheets
Why use CSS?
- Easier maintenance
- Better Usability
- Increased Accessibility
By removing all your inline formatting such as font tags etc., etc., etc. from your HTML and using an external style sheet not only will your pages reduce in size, but the sheet only needs to be downloaded once, which makes for a MUCH faster loading site, and, as we all know, visitors won’t stay around for long.
If you have a site you wish to convert Expression Web has some of the tools to do this. Obtain Migrating from FrontPage to Expression Web For a in-depth and comprehensive ebook guide. This Introductory tutorial on migrating gives you some ideas and insights into what you need to do.
Remember also that if your user’s browser does not support CSS, they will still be able to retain functionality; your content will still be available as plain text.
Increased accessibility allows you to cater to everyone (something the search engines like) and is likely to increase your SEO standing.
Style rules
A style is a set of formatting characteristics identified by a unique name. Styles enable you to quickly format a whole group of page elements in one simple task. The basic tenets of a Cascading style sheet are its style rules.
You can apply styles to most page elements in Expression Web including text (individual characters or entire paragraphs), graphics, divs and tables.
These colour coded examples should help explain exactly what is a selector a property and a value.
| Selector | Declaration Block | |
|---|---|---|
| h1 | { color: | #FF0000; } |
| .image-left | { float: | left; } |
| #name | { | } |
| property | value |
In order to determine how style rules should be applied we use Selectors to select the elements on a HTML page, so that we can style them.
Each type of style is distinguished from the other style types by its selector; a period (.) precedes the selector for a class-based style; a number sign (#) precedes the selector for an ID-based style; and the selector for an element-based style consists only of an HTML element, such as H1.
To determine our style rules we use a style declaration which consists of a single property and a value pair, separated by a colon (:) If we have more than one declaration they are separated by semicolons (;).
NOTE: So readability can be maintained, any white space inside a declaration block is ignored.
The declaration block is everything between (and including) the braces ({ }), a left curly brace ({) and right curly brace (}).
TIP: Its a good practice to finish the last declaration in a block with a semicolon though it is not required if there is only one declaration.
Working with Styles
A selector, to break it down, is really just a html tag with which you are formatting with CSS. There are different types of selectors.
- Element Selectors
- Class Selectors
- ID Selectors
There are also inline styles
NOTE: When combining selector elements, the type selector must always be specified first and the pseudo-element last. The other elements (class, ID, and pseudo-class) can appear in any order.
Element Selectors
Element Selectors stand alone or can be immediately followed by any combination (in any order) of a single ID, one or more classes, and a pseudo-class. Use an element selector to define a set of properties that you want every instance of a particular HTML element to use in a web page. When a selector matches an element in a page, the style rule associated with the selector is applied to the matching element.
For example, to create a margin of 10 pixels around all heading 2 tags in your web page, you create a style that uses the
H2 element selector and contains declarations
for margin properties, as shown in the following code.
The following example applies the margin-left and margin-right properties to all
H2 HTML elements in the document.
h2 {
margin-left: 10px;
margin-right: 10px;
}
NOTE: To reduce the size of style sheets, multiple selectors can be grouped in comma-separated lists. The comma character is a shorthand mechanism used to apply one declaration block to multiple element types. When grouping selectors, remember that the comma starts an entirely new selector from the beginning.
h1, h2, h3
margin-left: 10px;
margin-right: 10px;
}
To reduce the style even further we can write it inline.
h1, h2, h3 {
margin: 0px 10px 0px 10px;
}
NOTE: The values apply to margin top, margin right, margin bottom and margin left ALWAYS in that order. I think of this as TRue BLood for a mnemonic.
Class selectors
When it comes to Class Selectors the defining rule is that you can use them one or more times in a web page. So if you ever wanted to modify a particular class style each of the places you had applied the class style will automatically be changed.
The following example declares the class notes and specifies the font-size and color properties.
.notes {
font-size: 100%;
color: black;
}
You can assign this class to any HTML element:
<h3 class="notes">
If you want to restrict a CSS rule to specific HTML elements, include the element in the selector as follows:
p.subtext {
font-style: italic;
font-size: 0.8em;
}
This style rule will only apply to paragraph elements.
NOTE: You can assign multiple classes to a single HTML element.
<p class="notes subtext">
ID selectors
When it comes to ID selectors the defining rule is you can use it for a single item or block of items on one or more web pages. So ONCE per page only.
#menu {
background-color: #AABBCC;
margin: 15px;
}
Apply this CSS rule to a single HTML element.
<div id="menu">
Inline styles
Inline styles are defined directly within the HTML element, so when you want to define a set of properties for a single time or block of items in a web page and don't want to reuse that style you should use an inline style.
<p style="font-weight: bold; font-style: italic; color: #FF0000">
Span element
You might also want to apply a style to a section of text within a paragraph for that we use span element.
You can see this applied on this very page, in your browser right click and 'view page source' or 'view source' and you can see where I have been applying colour's to the style codes I have been showing you, so they are easier to understand. In this case I needed to apply different colour's next to each other, so I used the span element to do this rather precise styling.
<span class="bluebold">#AABBCC;</span>
.bluebold {
background: #FFFFFF;
color: #3333FF;
font-weight: bold;
}
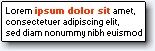 Fig
1 - The text shown in the example on the left has three words in bold and red — the result of a span element with a class being applied
Fig
1 - The text shown in the example on the left has three words in bold and red — the result of a span element with a class being applied
Inherited styles
Like a child inherits blue eyes from their parents, so can child elements inherit the styles of their parent element.
For example: By using the body element to declare such properties as the font-family and color, all the other elements on the HTML file will inherit the body styles because the Body is the Parent, so one does not need to set the font and colour for all the other elements on the page. (Unless they wish them to be different of course)
If any attribute is shared amongst your elements, they should always be in the BODY tag.
font-family: Arial,Helvetica,sans-serif;
color: #000000;
}
Now the rest of the HTML file will inherit the font-family and the colour.
However, be advised that different browsers look at things in different ways, so you should test your files in other browsers. You can test your site in various sizes with Any Browser or the Preview option under File | Preview in Browser - choose your size and browser(s) (Only browsers you have installed will be available and only if you have edited your Browser List.) In EW 3.0 and 4.0 you can also use SuperPreview which includes IE 6 plus whichever IE version you have installed and Firefox and SuperPreview for IE which includes only IE versions.
Here is a Table of what Browsers support.
Learn more about Cascading and Inheritance
Cascading Styles
Inline Styles will always override embedded Styles and External Styles Sheet
Embedded Styles will always override an External Styles Sheet and the order in which you insert external Style sheets such as Imported Style Sheets
This is, of course, known as the cascading effect and why they are called Cascading Style Sheets. Each are stepping stones to the other. Your rule of thumb is that the style nearest to the content is the one in charge, like a chain of command.
An imported style sheet is further way from the actual element than a linked style sheet, (external sheet) so the linked style sheet would ‘be in charge’. Any conflicting property stored in a linked style would override an imported style sheet.
Because of the order of precedence, :link pseudo-class selectors must be declared in the following order to work correctly: l v h a (I always think of this as LoVe HA as a memonic)
a:link {}
a:visited {}
a:hover {}
a:active {}
Conflicting properties
Properties 'conflict' when more than one source defines the same property differently. So go back through your styles if something is not working properly. It’s just a matter of ‘proper chain of command’ and, once you understand this, it’s easy to spot any mistakes you may have made.
For example here we have the style for the heading 1 tag in a external style sheet
h1 {color: #168916;
font-family: Arial, Helvetica, sans-serif;
font-size: 2em;
}
Here also, we have an Embedded Style Sheet that defines SOME of the same properties.
<style type="text/css">
h1 {
color: #FF0000;
font-family: Arial, Helvetica, sans-serif;
font-size: 3em;
line-height: 150%;
}
</style>
The conflicting properties are color & font-size. The font-family and line-height do not conflict.
The Embedded Style Sheet is CLOSER to the content (text) so that is the sheet that is ‘in command’ for those properties, in the case of the other two properties they work together because they are not in conflict.Ways to apply CSS Formatting
There are typically three ways in which you can apply CSS formatting, but there are more types.
- Link a page to an external (or linked) style sheet
- Create an embedded (or internal) style sheet in the head of a page
- Apply inline styles to individual page elements
- Other types of sheets Imported and Userstyles
External cascading style sheet
External cascading style sheets are the most useful because they can be attached to multiple Web pages. You can apply the same styles consistently across an entire Web site.
If you decide to change a style, you need only make one change - in the external cascading style sheet - and the pages in your Web site will reflect the change. Typically, an external style sheet uses the .css file name extension, such as site.css.
An external style sheet might look like this:
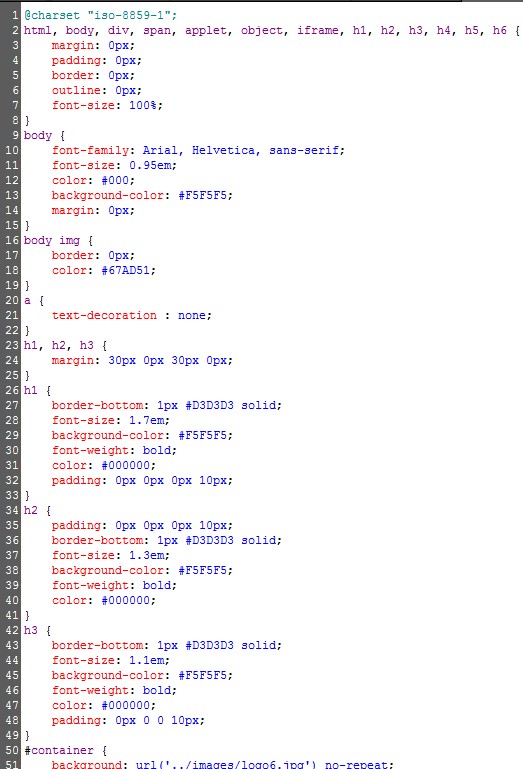
Fig 2 - External Cascading Style Sheet
The HTML code for linking to an external style sheet would look like this:
<link rel="stylesheet" type="text/css" href="styles/site.css" />
and be positioned between the <head> </head> tags in Code View.
Embedded cascading style sheets
When you create or modify a style to be used on a single page, Expression Web creates a cascading style sheet for you. Called an embedded cascading style sheet, it is a collection of code stored between html <style> tags between the <head> tags of the page. Any style you create for that page is stored in the embedded style sheet as a class selector.
NOTE: Embedded Cascading style sheets are sometimes called Internal Style Sheets. Remember they will only work on the specific HTML pages they are placed on.
Embedded CSS are very useful for Overriding. For example: if you have properties defined on the External style sheet that declare all paragraph text is rendered in black, but you want the paragraph text to be rendered in white for only one specific page, you could add an embedded style sheet rule directly below the linked style sheet that redefines the paragraph text as white. (See box below)
This is paragraph text defined as white p { color: #FFFFFF; } you can see it highlighted below. In the HTML file the external CSS link would be added first
An embedded style sheet looks like this:
<style type="text/css">body {
background: #FFFFFF;
font-family: "Times New Roman", Times, serif;
font-size: 1em;
color: #000000;
}
a:link {
text-decoration: none;
}
p {
color: #FFFFFF;
}
</style>
If you preset Expression Web after following the Setting up ebook for your version of Expression Web, then to implement a embedded style without resorting to typing it out in code view, I find the fastest way is to select a white background in Page Properties on the formatting tab (that only works if you are not using a page in a dwt) otherwise, use a setting from the Formatting, Standard or Common Toolbars to automatically produce the surrounding embedded code.
Inline cascading style sheets
Inline CSS contains user-defined styles that are applied to a single page element. This type of cascading style sheet is usually created when you add styles using the formatting, standard or common Toolbars IF you have the code formatting tab in Page Editor Options set to Manual, if it is set to Auto and inline classes is not ticked , then they will be embedded instead.
An inline style looks like this:
<p style="color: #E35252">some text</p>
You can find more information about inline styles
Other Types of sheets
Imported Style Sheets
The @import rule is used to call an external style sheet which can be from another External Sheet or from within the <head> </head> tags in your HTML file. The rule MUST come first before all other css rules. @import sheets are good for hiding styles from some browsers because they can’t cope with them and would most likely crash. There are also different versions of the @import rule as well and different versions work in different browsers.
A import link would look like this
<style type="text/css">@import url('style.css');</style>
and be positioned between the <head> </head> tags in Code View.
Learn more about @import
Userstylesheets (Accessibility)
IE/Win users can check under Tools > Internet Options > Accessibility to set their user stylesheet and options.
You can even make userstyles with this free bookmarklet, try it it’s fun.
Adding an ID="yoursite" attribute to the BODY element of each of your site's pages allows visitors to define their own styles for your site by combining CSS's ID selectors with descendent selectors:
/* --- default heading 1 style --- */
H1 {font-family: Helvetica, sans-serif;}
/* --- a heading 1 style just for your site --- */
#yoursite H1 {font-family: Impact, sans-serif;}
/* --- a different heading 1 style for another site --- */
#anothersite H1 {font-family: Univers, sans-serif;}
You can learn more about combining CSS's ID selectors
Read the second part of this tutorial Creating Styles and CSS in Expression Web
Written July 2010

Cheshire Web Designs - Cheshire website Designs by Any Expression Web Designs
Owner Any Expression Web Designs and Clarke Abstract Art
Copyright © 2006 - 2021 Tina Clarke of Any Expression Web Designs All Rights Reserved
Are you looking for a Web Designer?Web Designs created by Any Expression Web Designs