Expression Web 3.0 SuperPreview
When it comes to designing your template, one of the main things you have to take into consideration is all the different browsers and their versions. For the initial testing Microsoft has launched SuperPreview for Expression Web and also Snapshot with Expression Web 3.0 and 4.0.
SuperPreview Online Service
For new features in Expression Web 4.0 only and new features in Service Pack 1 - Read the SuperPreview Online Service in Expression Web 4 tutorial to further your knowledge. You might like to do this before reading the SuperPreview article and working through the exercises. This article was written in 2009 when fewer browsers (and versions) were included in SuperPreview, hence the reason it does not cover them. If however you wish to delve a little further you should sign up for the online service before you begin. If not, I suggest you wait so there is less clutter for you to be distracted by till after you have worked through the starter kit and exercises.
NOTE: If you do not have EW 3.0 and 4.0 you can download Microsoft Expression Web SuperPreview which is a free standalone. This version has the same functionality as the full version that comes with Expression Web 3.0 and 4.0 for a trial period of 60 days. After that period it will default to working ONLY with IE browser, however it will work with all versions of IE.
What SuperPreview does not do for you is magically fix anything, its a tool to help you recognise trouble spots and then you have to figure out how to fix them. Along with SuperPreview we recommend a variety of other tools to help you do that. That includes validation.
For this article we will use a series of starter kits websites, which are downloadable from Expression Web SuperPreview Starter Kits follow along with this exercise and so gain a greater insight into how to use SuperPreview and address browser problems and their fixes. So go download the web package - full instructions are given. Then you will be ready to start.
Fig 1 - Overview of SuperPreview
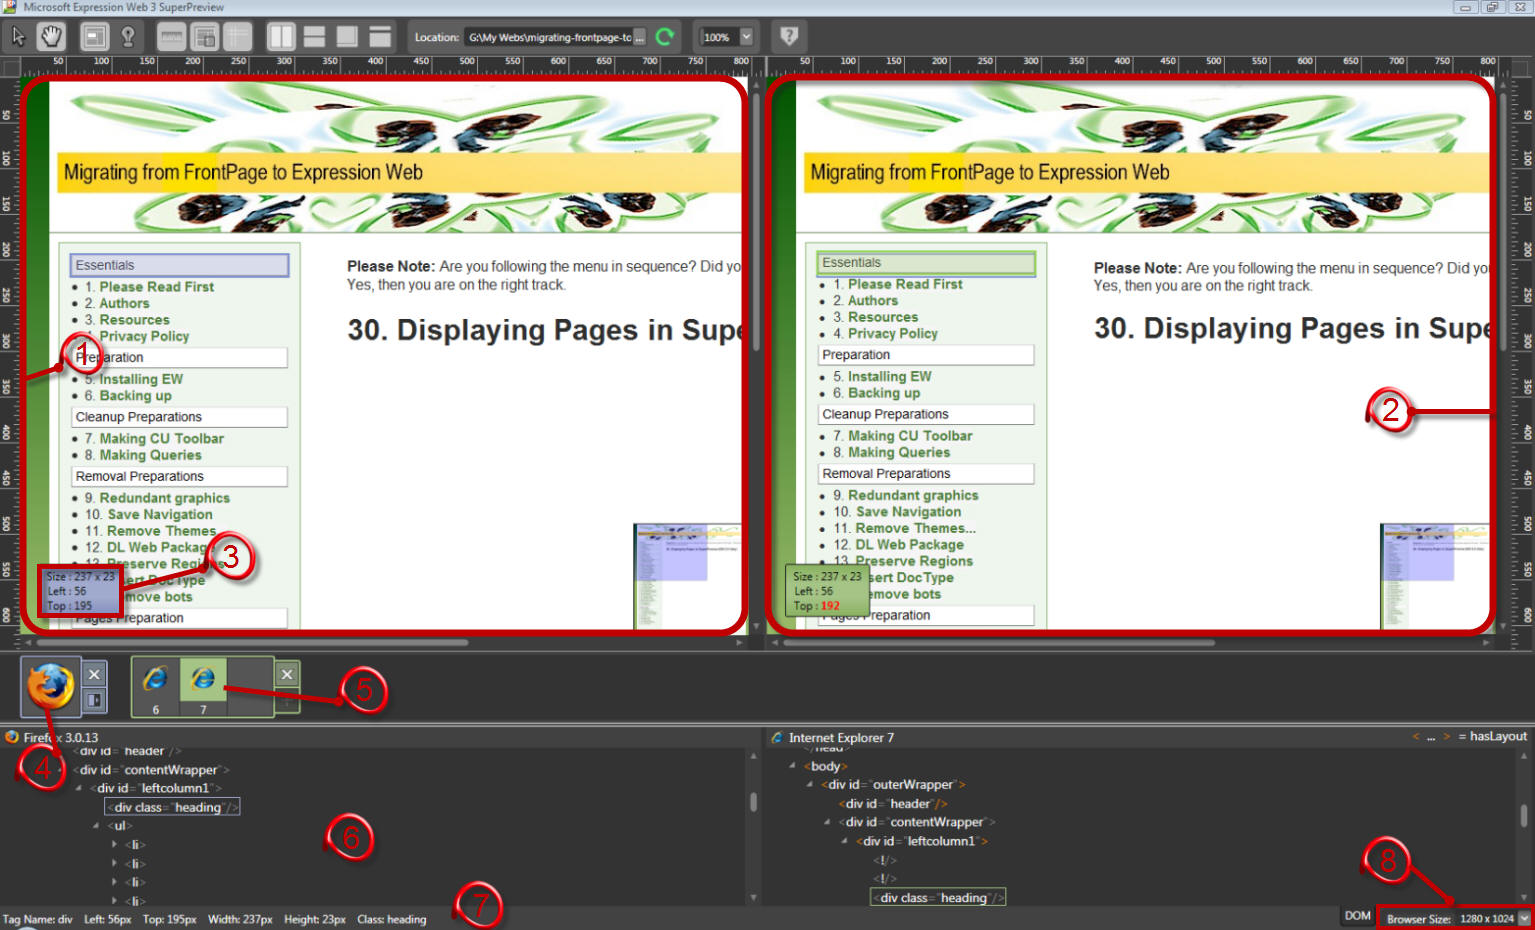
- Baseline view - This view displays the selected page in your developmental browser. i.e. the baseline browser against which you will compare other browsers
- Comparison view - This view displays the selected page in the selected comparison browser.
- Quick position display - This display shows you the size and position of a selected element. If there are any differences, the altered value is highlighted in the comparison browser view.
- Baseline browser selector - This lets you choose your development browser as the baseline browser.
- Comparison browser selector - This lets you choose up to eight comparison browsers. By clicking on their respective icons you can easily switch between them.
- DOM tree view - This shows you where an element is in the DOM tree. You can click on an element in the DOM view to select it in the browser views.
- Tag display - This shows detailed information about an element when you move your mouse pointer over it or click it.
- Browser Size - This lets you select a fixed browser view size to compare how your pages render at different resolutions. The minimum Browser Size is 640 x 480.
Pointer Modes
![]() Fig 2 - Selection Mode Pointer (left) and Panning Mode Pointer (right).
Fig 2 - Selection Mode Pointer (left) and Panning Mode Pointer (right).
When you want to interact with SP you will need to use either the selection or panning mode pointers. To select individual page sections for comparison you will need the Selection Mode Pointer and the Panning Mode Pointer to enable you to drag the page around in the browser view. The default mode is for SuperPreview to display in side-by-side mode with the selection tool active.
NOTE: When you use one pointer mode you automatically deselect the other pointer mode.
The Selection Mode Pointer will highlight the boundaries of any HTML element that is selected. This is done by the extents calculated by the browser upon rendering the page. The highlight is shown as a shaded outline and the element size and position calculations are shown in the lower left of each pane in the Quick position display (see (3) in Fig 1 - Overview of SuperPreview) When the page is rendered SP also executes all the scripts on the page through the OnLoad event so if any of the client scripts are designed to change the rendering that is 100% exactly what you will see, as you would see it if you were looking at the browser directly.
NOTE: SuperPreview 3.0 and 4.0 is not a interactive 'type of browser' so none of your links or menus will work. However with Expression Web Service Pack 1, SuperPreview now has the SuperPreview Online Service.
Open SuperPreview
ACTION ONE
Open the first of your starter kits called 01-superpreview-intro and open the default.htm file
The quickest and easiest way to view the page you want is to first open the page within your web in Expression Web, then open SuperPreview in one of the following ways;
- Click the 'Display in SuperPreview' icon -

- Go to File - Display in SuperPreview
- Press Shift + F12
The page will then be displayed in SuperPreview in the left hand pane. However, only if you have already set the baseline browser.
To set the baseline browser
To set the baseline (this means the first browser you wish to compare other browsers against) simply click one of the Browser icons on display on the left hand pane. SuperPreview will then ask you to enter a website address to generate the preview. Since you opened SP with a page open, the address of the page is already in the Location Pane. Simply click the green Refresh arrow or use the keyboard shortcut Control + R and the page will display.
Step 1 - Set the Baseline browser to Firefox
Enter a location address
If you do wish to enter an address just click the browse button (see Fig 3 - Browse Button) or use the keyboard shortcut Control + O.
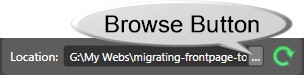 Fig 3 - Browse Button
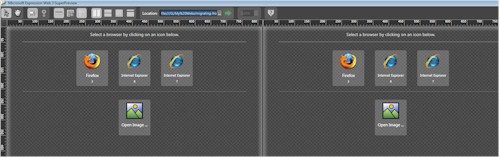
NOTE: Only the browsers that are installed on your computer that are supported by SuperPreview will appear, though you can choose up to six Comparison browsers in theory, this includes Open Images (for example mockups).
Fig 4 - Select a Baseline Browser
You can use SuperPreview to display pages in the following versions of Internet Explorer, depending on which versions you have installed on your computer:
- Internet Explorer 8 Preview in Internet Explorer 8, (available only if Internet Explorer 8 is installed).
- Internet Explorer 8→7 Preview in Internet Explorer 8 running in Internet Explorer 7 compatibility mode (available only if Internet Explorer 8 is installed).
- Internet Explorer 7 Preview in Internet Explorer 7 (available only if Internet Explorer 7 is installed).
- Internet Explorer 6 Preview in Internet Explorer 6.
SuperPreview includes a built-in rendering engine for IE6, so you don't have to install it on your system. The only other browser available at the time of writing is Firefox and the version depends on the one that you have installed. During an interview by .Net Magazine (Oct 2009) (known as Practical Web Design in the USA) Ed Meadows, Senior Product Manager for Expression Web told readers there was work afoot to bring in more browsers.
.net: "SuperPreview is a cracking tool. Are there any plans to incorporate all major browsers into the free version?"
EM: "Thanks. Yes, we’ve gotten great feedback about SuperPreview and how it solves a key productivity issue for Web developers and designers. We know that designers and developers test their Web sites on more browsers than we currently support and we’re working to address that."
Comparison View
After selecting a baseline browser you need something to compare it against. This is what the other pane is for. Select the first browser you wish to compare against and then add any others in succession.
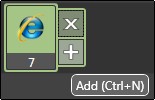 Fig 5 - Comparison and adding another browser
Click the plus sign to add another browser or use the keyboard shortcut Control + N You can add more than one browser to the Comparison View
Then click the Refresh Icon or use the keyboard shortcut Control + R and your page will now appear in both views.
Step 2 - Set the Comparison View to IE7 and then add IE6
Zoom
![]() View Screen Shot - Fig 6 - Zoom
View Screen Shot - Fig 6 - Zoom
You can also zoom and magnify from a range of 6% to 500% using the zoom icon or the keyboard shortcut Shift and + or - If you hold down the Shift key and plus or minus it will run through the magnifications. If you have a scroll wheel on your mouse you can also scroll through the magnifications. The default magnification is 100% and affects both panels simultaneously. Zoom will also alter on the minimum reduction depending on the Browser Window Size
Step 3 - Click the Zoom pull-down menu and zoom out to smallest reduction so you can see the entire page in both views.
Now there is a minimal, but noticeable difference in the text between browsers, specifically in the Clarke Accessories header. If this is not immediately obvious, click back and forth between Firefox and IE6 or IE7 several times. SuperPreview is designed to quickly identify visual changes using this method.
Box and Lights-Out Highlighting Modes
![]() Fig 7 - Lights-Out Highlighting Mode
Fig 7 - Lights-Out Highlighting Mode
This mode highlights the selected element in blue in the Baseline Browser View. In the Comparison Browser View the selected element is in green.
![]() Fig 8 - Box Highlighting Mode
Fig 8 - Box Highlighting Mode
This mode displays the selected element normally, whilst dimming the remainder of the page. Just press the keyboard shortcut L to switch between the two by hitting the key twice in succession.
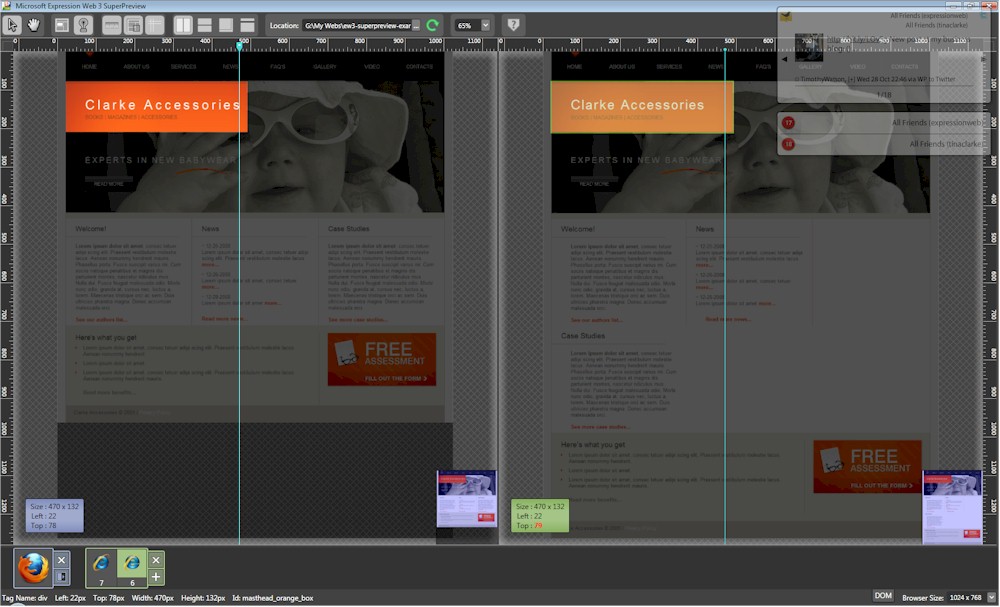
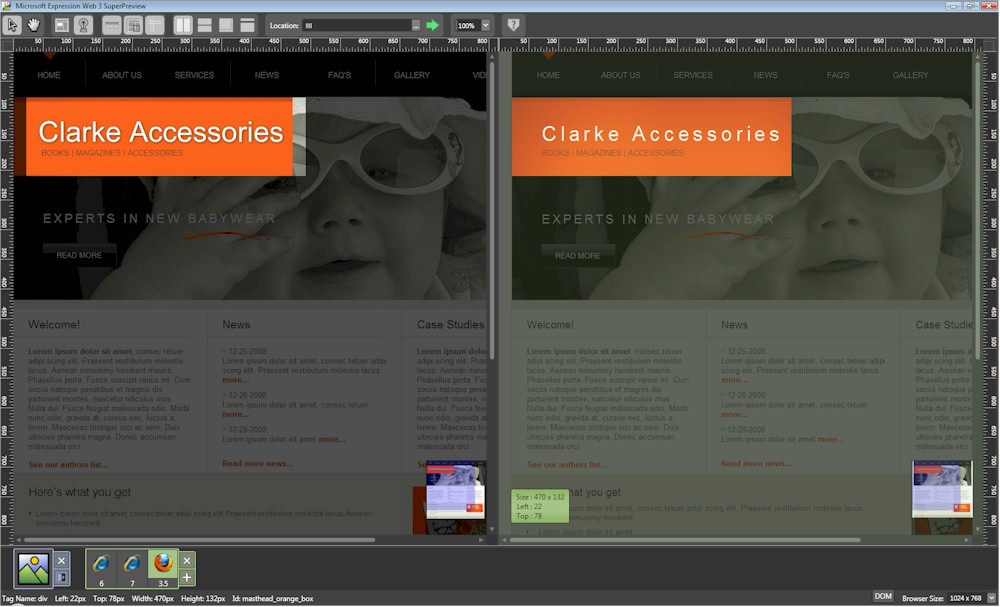
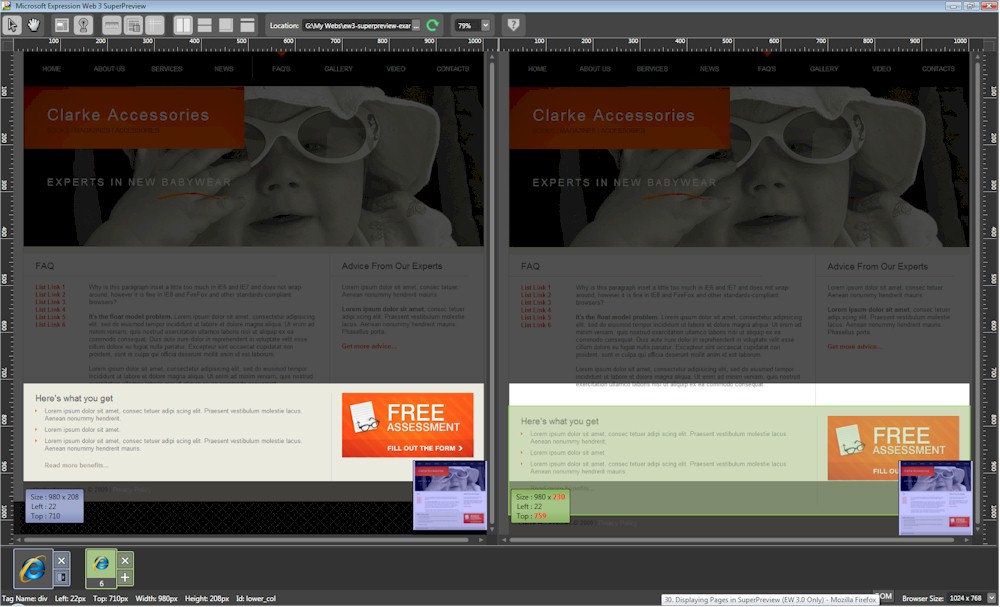
Step 4 - Click the words Clarke Accessories in the baseline browser screen.
The text will highlight in blue in the baseline screen, and in green in the comparison screen. Notice that the text in IE7 and IE6 does not reach as far as it does in Firefox. This helps identify an issue with the rendering of this text.
![]() View Screen Shot - Fig 9 - Box and Lights-Out Highlighting Modes showing banner text lengths
View Screen Shot - Fig 9 - Box and Lights-Out Highlighting Modes showing banner text lengths
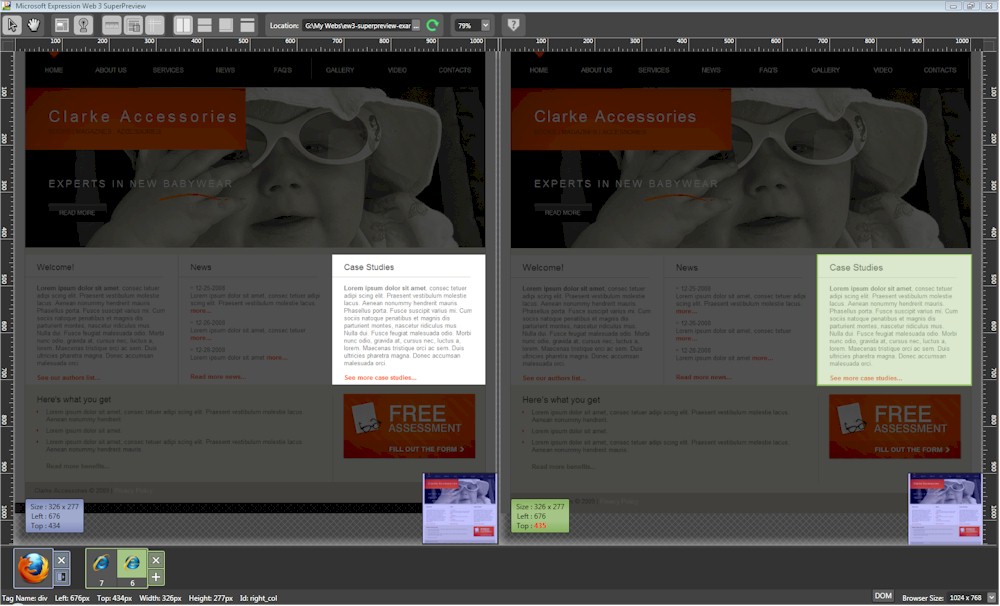
There is an even bigger problem in IE6 however, the case studies is wrapping to the next line.
Step 5 - Click the case studies box to highlight it.
![]() View Screen Shot - Fig 10 - Box and Lights-Out Highlighting Modes showing wrapping case studies
View Screen Shot - Fig 10 - Box and Lights-Out Highlighting Modes showing wrapping case studies
As we mentioned above the Quick Position Display gives us more details
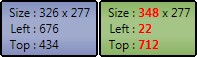 Fig 11 - Quick Position Display
The baseline Quick Position Display in blue on the left shows us the size should be 326 pixels in Firefox whilst the green QPD in green on the right shows us outlined in red that somehow the box has increased in size by 22 pixels, the positioning is pretty far out as well.
If we take a look in other layout modes such as horizontal Split Layout and Overlay Layout this further highlights the differences with these problems
Layout Modes
| Toggle Icon |
Type | Description | Keyboard shortcut |
|---|---|---|---|
| Vertical Split Layout | Compares browser views arranged side by side. | A | |
| Horizontal Split Layout | Compares one browser view to another that is underneath it. | S | |
| Overlay Layout | Compares browser views in overlay mode. | D | |
| Single Layout | Displays a single browser view. | F |
Note: Overlay Layout is sometimes also known as the "Onion skin" layout. The Vertical Split Layout is the default Layout.
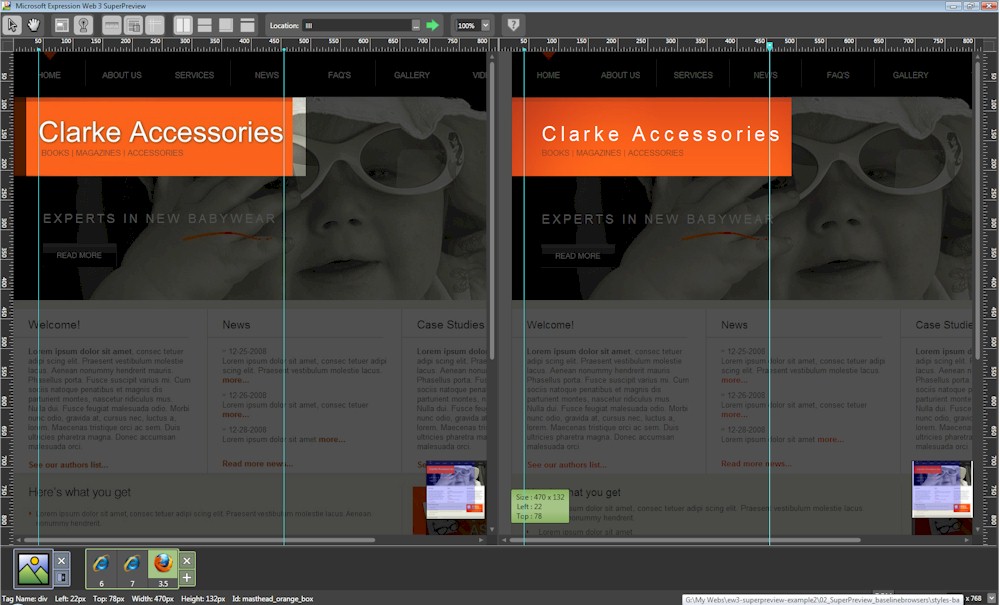
Step 6 - Use the positioning guides to measure just how far the text extends on the banner in between Firefox and IE6
If we use the positioning guides we can measure text in the comparison browser versus the baseline and help us identify exactly how much difference there is between the letter spacing of our heading in the two browsers.
![]() View Screen Shot - Fig 12- Positioning Guides
View Screen Shot - Fig 12- Positioning Guides
Ruler display
![]() Fig 13 - Ruler Visibility Toggle
Fig 13 - Ruler Visibility Toggle
To turn Ruler display on or off you must click toggle Ruler Visibility or use the keyboard shortcut R
NOTE: The ruler display must be on to create positioning guides.
Positioning Guides
![]() Fig 14 - Positioning Guides Toggle
Fig 14 - Positioning Guides Toggle
Positioning Guides can be used to show the placement of multiple elements within a page
To create a horizontal guide click the horizontal ruler or use the keyboard shortcut control + ;. This allows you to drag the horizontal ruler to a location within the page view. Whilst the guide is selected, the vertical distance from the guide to the upper-left corner of the page is displayed in pixels. If you wish to remove it simply drag the guide out of the page display. The same rules apply to the vertical ruler guide.
Step 7 - Now we have seen what our problems might be its time to fix the most serious.
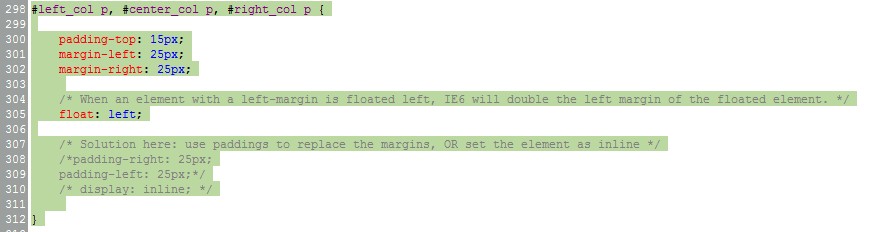
Pressing Alt-Tab on your keyboard allows you to switch over to Expression Web. One of the bugs we have been looking at in IE6 is called the Double-Margin Bug. To fix this bug we need to use Expression Web, so open the Folder List Panel (Alt + F1) if not already open and double click the intro-styles.css file to open it. Scroll down to about line 310, then remove the commenting around the line ‘display: inline;’ by deleting the /* characters in front of the rule and the */ characters after the rule. Go back to your default.htm page where you won't see any changes.
![]() View Screen Shot - Fig 15- Code View
View Screen Shot - Fig 15- Code View
After you have removed the comment characters that the rule will change to red and blue, which means the rule is now active. Removing the commenting characters will make this rule apply to our page. To see the fix being applied we need to go back to SuperPreview and refresh. Click the SP icon and Expression Web will ask you to save the .css embedded file and then automatically switch to SP.
![]() View Screen Shot - Fig 16- Double-Margin Bug fixed
View Screen Shot - Fig 16- Double-Margin Bug fixed
Indeed we can see the case studies in IE6 is now matching Firefox and the bug is fixed.
You have now seen how SuperPreview can successfully debug websites using multiple browsers on the same system.
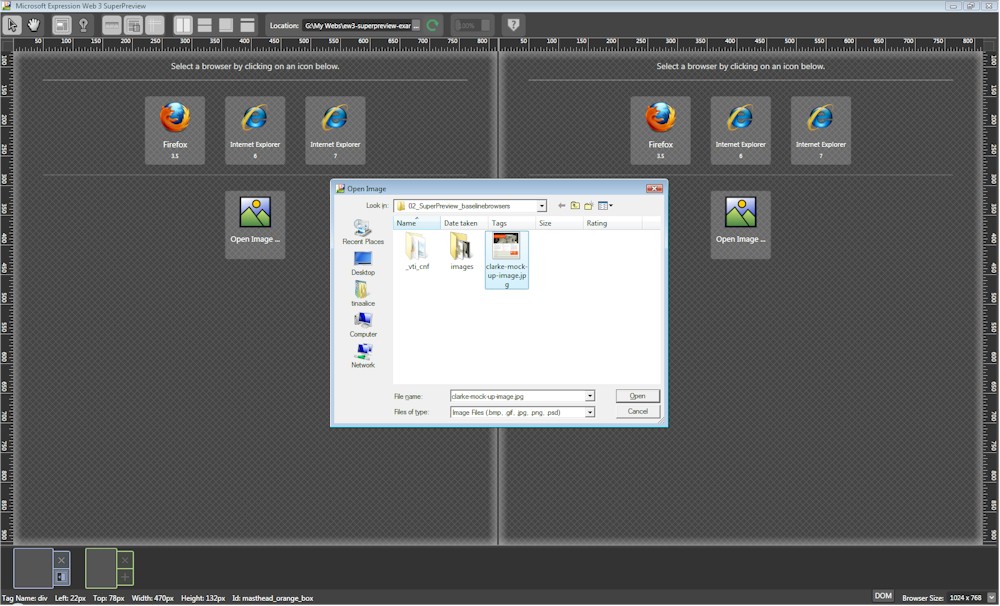
Step 8 - Comparing Image mockups
Open Image
Many designers use Image mockups, in particular Photoshop (PSD) files to start off their design process, so in SuperPreview this has been catered for with Open Image which you can choose from in the Comparison Panel. Just select the Open Image Icon and browse to your mockup. It will support all the usual image formats such as .bmp, .jpg, .gif, .png and as I said .psd.
With Firefox being the only locally supported third party browser so far, and the remote online browsers cover Safari for Mac and Chrome only at this point (with different versions). So a neat trick is to save a screenshot lets say in Opera and use this image to compare against.
ACTION TWO
For this exercise you need to open the folder 02-superpreview-baselinebrowsers and open the default.htm file
Step 9 - Redefining your baseline browser to diagnose a problem
Click the SP icon to open SuperPreview
In the Baseline screen you need to load the clarke-mockup-image.jpg in the 02_SuperPreview_baslinebrowsers folder. Just select the Open Image Icon and browse to your mockup.
![]() View Screen Shot - Fig 17- Using Open Image as a baseline
View Screen Shot - Fig 17- Using Open Image as a baseline
In the comparison browsers load IE6, then IE7 and Firefox
This exercise is to show you the use to which Open Image can be put. Some designers use a Image Editing program such as PhotoShop to make a mockup design so they have a visual reference of how the template should look and then code in html and css. Here we want to see how close the mockup and the final design compares in the different browsers
![]() View Screen Shot - Fig 18- Comparing Open Image with Browsers
View Screen Shot - Fig 18- Comparing Open Image with Browsers
There is not much difference apart from the Clarke Accessories banner, if we compare the baseline mockup with the comparison views in IE 6, IE 7 and Firefox, it looks like we have both typeface and spacing discrepancies between the banners. You can see this even more clearly when we use the positioning guides.
![]() View Screen Shot - Fig 19- Open Image with Positioning Guides
View Screen Shot - Fig 19- Open Image with Positioning Guides
Now lets go back to Expression Web (Alt + Tab on the keyboard) If we click the Clarke Accessories banner, we can see the text is a heading 1 tag. We could use CSS styling but it might be simpler to swap out the heading text for an image and will make better SEO (search engine optimisation) sense as well, this is because if we have the same heading 1 tag on each page we are not doing ourselves any favours, each page heading 1 tag has to be unique as each page is unique.
If you want to finish this exercise you will need to go to <div id="masthead_orange_box"> in the Code View (you can find this more easily by clicking on the heading tag in Design View and the h1 tag will be highlighted in Code View with the masthead_orange_box id just above it. Hold down the Control key on the keyboard and click the masthead_orange_box id, this will take you STRAIGHT to the style in your baseline-styles.css file.
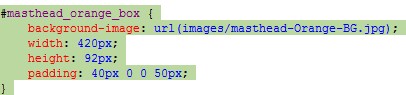 Fig 20 - Masthead_orange_box id style
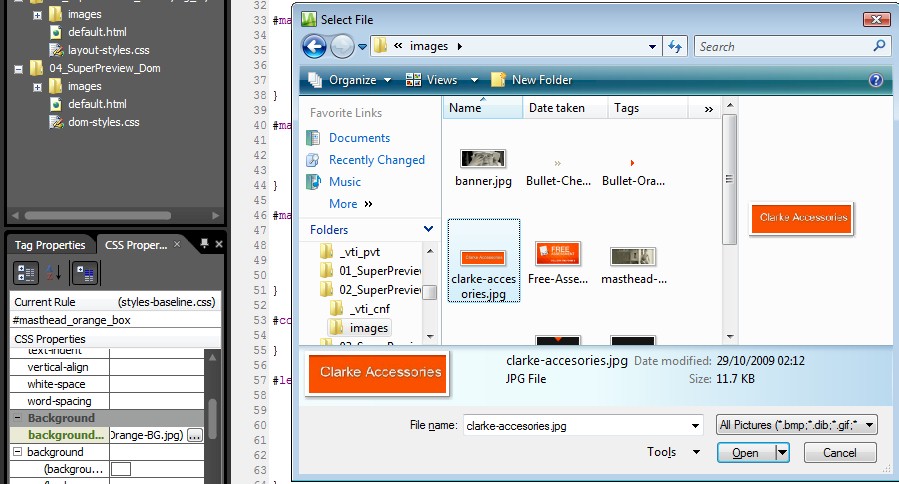
Click on the background-image and open you CSS Properties Panel if it is not already open (you can do this via the Panels menu). When you click on the background-image in CSS Properties the background-image style will be highlighted, open the image selection and browse to the images file and select the clarke-accessories.jpg file, press Open and the graphic will be changed.
![]() View Screen Shot - Fig 21 - CSS Properties
View Screen Shot - Fig 21 - CSS Properties
If we change back to the Design view of our default.htm page, the text for the Books | Magazines | Accessories might be out of position so you just need to tweak the height and padding a little, so go back to the .css file and change the height to 52px and the padding to 80px.
#masthead_orange_box
{ background-image: url('clarke-accesories.jpg');
width: 420px;
height: 52px;
padding:80px 0 0 50px;
}
Save your work and use SP to see the results. We can see that the image is not perfect to our mock up, however in each of the browsers the banner looks the same, which is the important thing.
You’ve now seen how to compare an html layout to a page mockup, and also how to redefine your baseline and comparison browsers.
ACTION THREE
For this exercise you need to open the folder 03-superpreview-dom and open the default.htm file
Step 10 - Identify the source of layout problems and working with the DOM View
Click the SP icon to open SuperPreview and define your baseline browser as Firefox and your Comparison browsers as IE7 and IE6
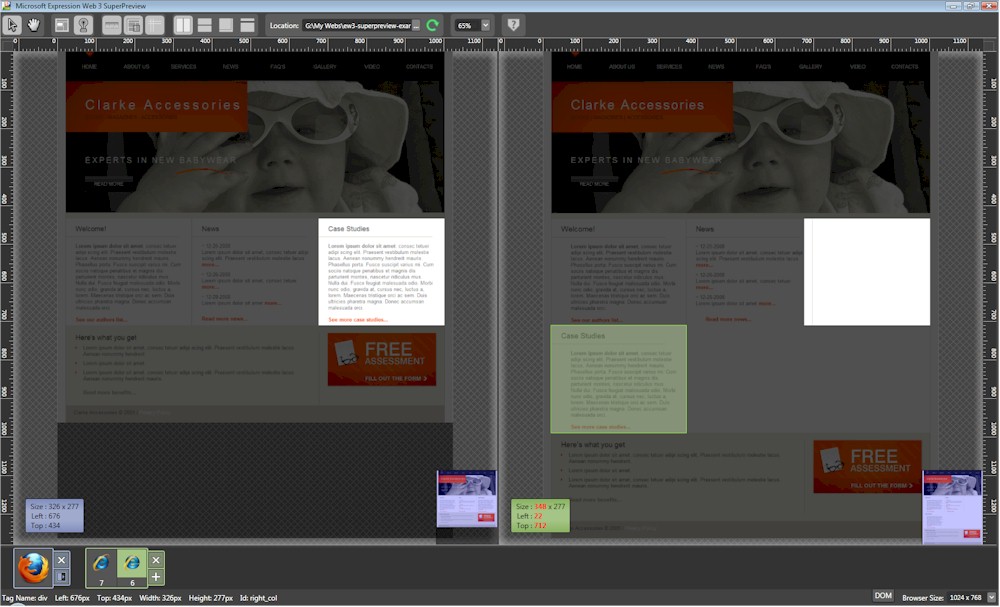
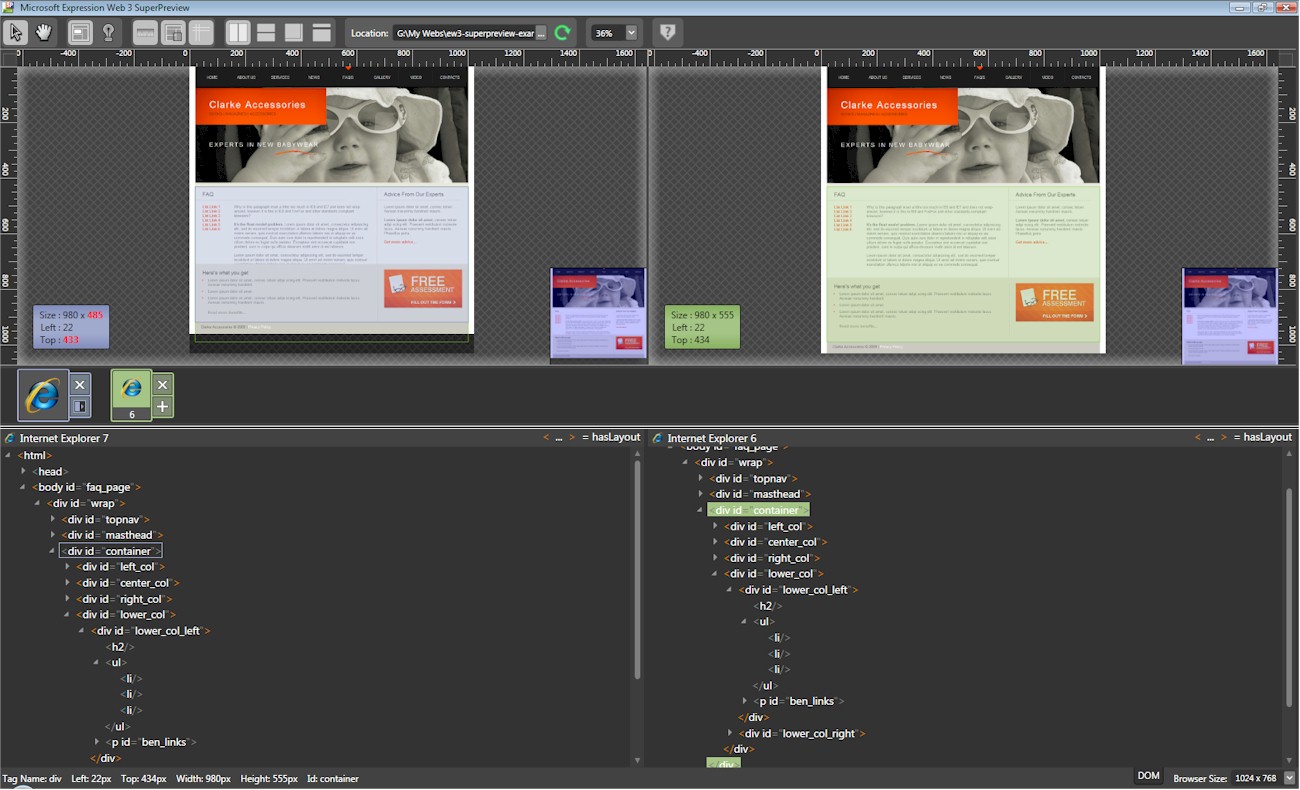
Immediately we can see in the screen shot of Firefox and IE7 below that we have a layout problem, to make it clearer zoom out to the smallest percentage. Using the Lights-Out Highlighting Mode we can use this as a visual guide to pinpoint that the paragraphs in the FAQ section are not wrapping around the links to their left as desired.
![]() View Screen Shot - Fig 22 - Layout problems in IE7
View Screen Shot - Fig 22 - Layout problems in IE7
Lets see if there are more differences in IE6. There are, lets redefine the baseline browser to IE7 and keep the Comparison browser as IE6, now we find there is a problem between IE7 and IE6.
![]() View Screen Shot - Fig 23 - Layout problems between IE7 and IE6
View Screen Shot - Fig 23 - Layout problems between IE7 and IE6
The original text-wrapping problem seen in IE7 is still there in IE6, however if you zoom out to see the bottom of the page, you’ll now also see an issue with the spacing at the end of the FAQ paragraph. Now that you know that there are two problems (that may or may not be related).You’ll want to tackle the differences between 7 and Firefox first, and then address the issues with other browsers afterward. Again, the logic here is that there are more instances of users using the newer Firefox 3.5 rather than the older IE6, therefore the urgency to fix issues between Firefox and IE7 is greater than Firefox and IE6.
The issue with the first layout problem is identifiable as a floating box problem, which results in Firefox rendering the text wrap correctly, while IE versions 7 and 6 do not. To fix this we need to modify a CSS rule in Expression Web.
However before we do that, we should use the DOM View to explore our second problem more in-depth.
Step 11 - Using the DOM view to narrow the scope of your search
Part of the problem of troubleshooting code is not knowing where to make a start. That's what SuperPreview is there for. Visually SP allows you to identify and isolate problematic areas, using the DOM view takes you further in-depth and identifies the names of the elements that are causing you headaches.
DOM (Document Object Model) Tree View
The Box and Lights-Out modes work in conjunction with the DOM tree view which shows you where an element is in the DOM tree and because SuperPreview combines image renderings with DOM data if you’re using the vertical-split or horizontal-split layout views, you can select an element in either browser view, and the DOM view will be updated to display the attributes for the selected browser view. Or, you can select an element in the DOM view to update the browser views. To help you pinpoint an element that has compatibility problems SP will also provide you with such element information as position, dimensions and ID. To turn the DOM Tree View on or off just click the DOM tab on the bottom right hand corner or use the keyboard shortcut O. Within the DOM Tree view, you can expand the nested elements and they will branch out - unsurprisingly - like a tree by which you can navigate.
Step 12 - In the bottom right corner of the SuperPreview window, click the tab labeled DOM and a new section will expand.
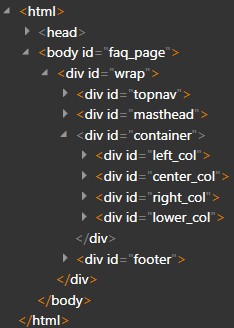
Fig 24 - DOM Tree in action
To see the DOM tree in action, click the arrow to the left of the <html> tag to expand it. Then click the arrow to expand the body tag and then the element labeled <div id=”wrap”>. Expanding this element exposes the div elements that compose the structure of your page:
topnav
masthead
container
footer.
Note that by having named the div id's with logical names, the process becomes that much easier. The container id seems to be the most likely candidate and we can confirm this by observing a rather neat feature of the DOM view.
On DOM Tree View on the far right of the Comparison View you will observe a label which is orange and says < ... > = hasLayout
Quite a few of IE's rendering inconsistencies can be fixed by giving an element “layout.” When elements are not enabled with the hasLayout problems can occur. The hasLayout concept determines how html elements are drawn and how content within them interacts with other content.
Upon looking at the elements, you can see most of the end brackets are in orange this means they have hasLayout, those whose end brackets < > are greyed this means that the hasLayout has not been applied to that element.
NOTE: The hasLayout property has no meaning in IE8 mode, so you won't see orange brackets when using SP with this browser.
In looking we see that the container brackets (a logical choice we have already made) are greyed out, so in using the DOM View in this manner we confirm our thoughts.It is worth learning more about hasLayout to understand many of the bugs that IE6 throws at us (more information in resources below)
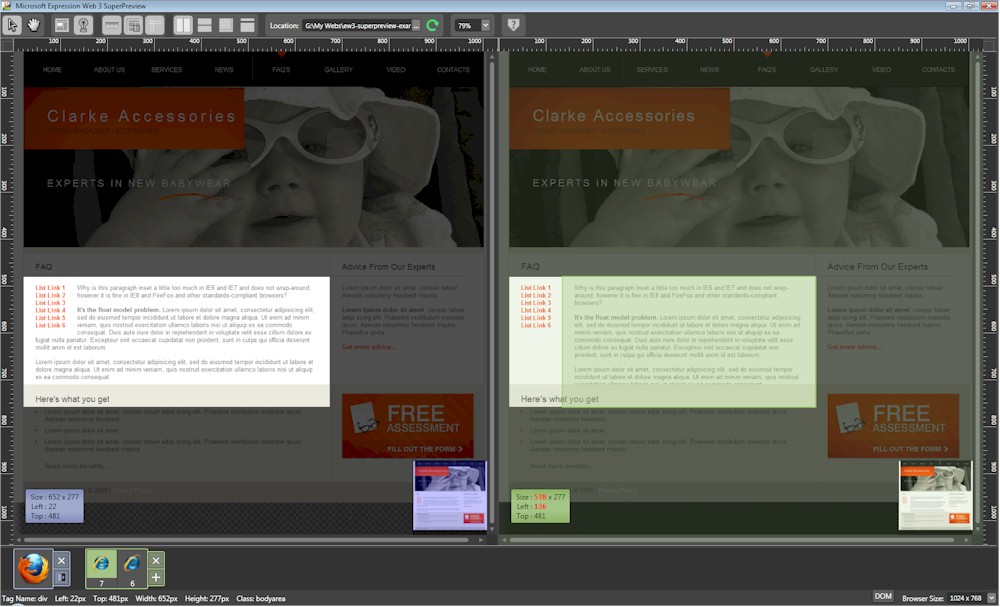
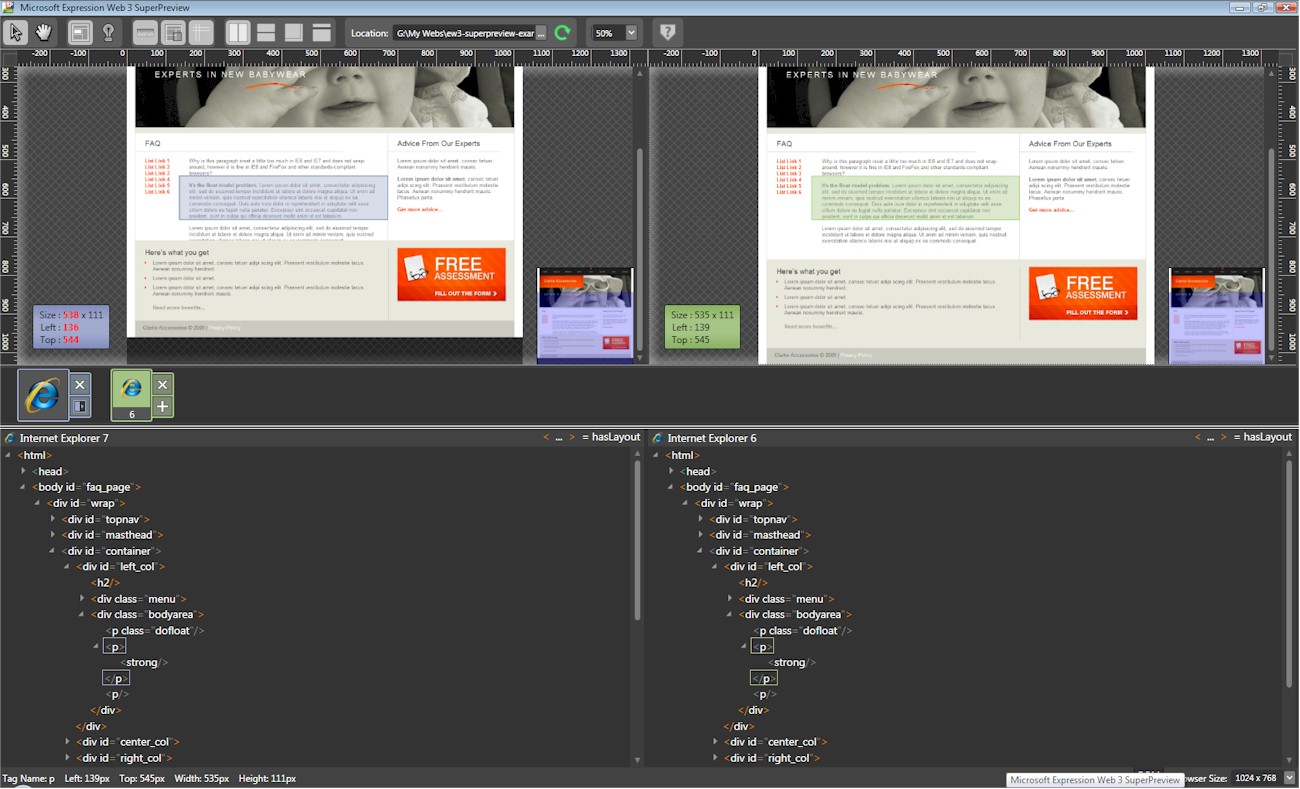
In the IE6 Comparison view within SuperPreview click the second paragraph (beginning with the line “It’s the float model problem”). In addition to the visual highlighting, you will now have expanded the DOM view and it has identified the selected element with the class named “bodyarea” and more specifically a paragraph with a class named “dofloat”.
![]() View Screen Shot - Fig 25 - HasLayout problems between IE7 and IE6
View Screen Shot - Fig 25 - HasLayout problems between IE7 and IE6
Step 13 - Press Alt-Tab on your keyboard to toggle into Expression Web 3
Double-click the styles.css file in the Folder List panel to view the CSS code for your page. Because we identified the name of the problematic element as bodyarea we can do a quick search for it in Expression Web rather than scrolling through the document. Press Ctrl+F to open the Find and Replace window and in the Find What section type bodyarea, then click Find Next. You will be sent immediately to this line in your CSS code and it is highlighted in grey. It should be on line 383 at the end of the document. Next locate the line of code that begins with ‘height: 100%.’ This is the rule that’s triggering the floating box problem and delete the line ‘height: 100%’ and save your file.
Press Alt-Tab to return to SuperPreview.
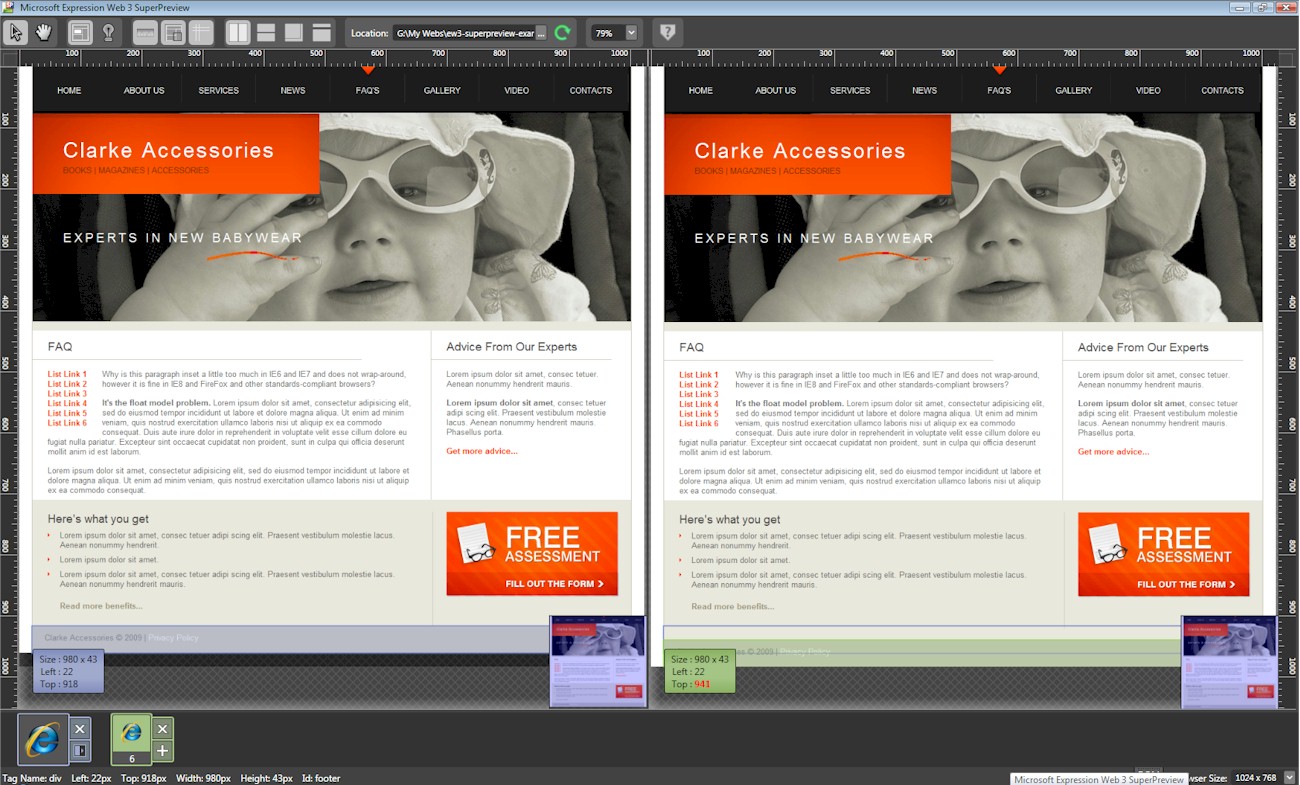
In SuperPreview, refresh the screen by clicking on the Refresh button.
Toggle between Internet Explorer 6 and 7 in the Comparison view to see that the problem with floating box problem and the second problem with spacing is now solved.
![]() View Screen Shot - Fig 26 - Results
View Screen Shot - Fig 26 - Results
Browser Size Drop-Down
The Browser Size Drop-Down lists a number of resolution settings and if the one you want is not listed you can make a Custom size of your own. SP will regenerate if you choose a new resolution setting.
Thumbnail Visibility
You might wish to locate a section of the page more quickly and by clicking on the Thumbnail Visibility Toggle or using the keyboard shortcut T you can do just that.
![]() Figure 27 - Thumbnail Visibility Toggle
Figure 27 - Thumbnail Visibility Toggle
![]() Figure 28 - Thumbnail Navigator
Figure 28 - Thumbnail Navigator
In the Thumbnail which will appear on the bottom right of the panes, if you mouse over the thumbnail and hold down the left mouse button you can drag the faded blue square around the thumbnail to go quickly to another part of the page, or you can click within the thumbnail, to go straight to that location within the page.
Feedback
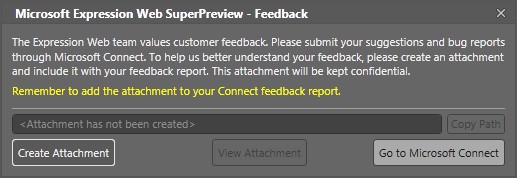
If you have any problems or wish to give feedback you can go to the Help Icon (see Fig 29) and click the Send Feedback selection this will pop up with a dialog box.
![]() View Screen Shot - Fig 29 - Help Icon
View Screen Shot - Fig 29 - Help Icon
The SuperPreview Feedback dialog box will allow you to create a attachment - Which is done automatically for you - You then click the 'Go to Microsoft Connect' button on the bottom right corner where you can submit your bugs and suggestions. (see Fig 30)
![]() View Screen Shot - Fig 30 - SuperPreview Feedback
View Screen Shot - Fig 30 - SuperPreview Feedback
Now you have seen how to fix some of the more common browser problems, which should give you a head start in coming to grips with SuperPreview.
When I asked you to download the starter kit in order to follow along with this article I adapted the starter kit that Microsoft provides. I did this partly because I found myself incapable of producing a bad template on purpose, sometimes it takes a virtuoso to produce bad output on purpose:) If nothing else Expression Web will give you good habits, mine started with FrontPage 2003 and split view.
If you wish to view the videos and download the Microsoft Starter kit they are well worth doing so. I feel the above information though to be a little more condensed.
Previewing ASP.NET or PHP web pages
You can preview ASP.NET or PHP web pages by using Microsoft Expression Development Server. The Expression Development Server installs when you install Expression Web. If you need to repair or reinstall Expression Development Server, see Installing Expression Development Server. For more information on previewing ASP.NET or PHP web pages, see Previewing an ASP.NET page or Previewing a PHP page in Expression Web 3.0 Help.
Resources
Other browser previewing solutions
- My debug bar
- Internet Explorer Application Compatibility VPC Image - VPC Hard Disk Images for testing websites with different Internet Explorer versions on Windows XP and Windows Vista
- Windows XP Mode and Windows Virtual PC
- Virtual PC Tips and Hardware Assisted Virtualization
- Windows 7 - Seamless Apps in Windows Virtual PC (Virtual XP) and Application Compatibility
- Microsoft Expression Web SuperPreview standalone
- Review of Cross-Browser Testing Tools
- Reliable Cross-Browser Testing, Part 1: Internet Explorer
CSS Fixes
- IE CSS bugs that will get you every time
- IE 6 and peekaboo bug
- Using conditional comments and zoom to fix IE
- Different techniques for applying the png hack
- IE Primer
Best practices
Expression Web 3.0 SuperPreview - Written December 2009 (amended August 2011) by

Cheshire Web Designs - Cheshire website Designs by Any Expression Web Designs
Owner Any Expression Web Designs and Clarke Abstract Art
Copyright © 2006 - 2021 Tina Clarke of Any Expression Web Designs All Rights Reserved
Are you looking for a Web Designer?Web Designs created by Any Expression Web Designs